Water leaks in walls and roof structures are among the most persistent and damaging issues a homeowner in India can face. Whether it is the relentless battering of the monsoon rains or a slow, hidden plumbing failure behind a tiled bathroom wall, moisture ingress can compromise the structural integrity of your home, ruin expensive interior finishes, and even pose health risks through mold growth. Identifying the root cause of these issues requires a systematic approach, as the source of a leak is rarely exactly where the damp patch appears.
Ignoring a small stain on the ceiling or a slight bubbling of paint on a bedroom wall is a mistake that leads to exponential repair costs later. Moisture travels through capillary action in concrete and brickwork, meaning a leak in one corner of a terrace could result in dampness in a ground-floor room. This complexity is why understanding how to plan home construction in India and implementing professional planning is essential. Construction Estimator India specializes in helping property owners navigate these challenges by providing accurate cost estimations and repair roadmaps before a single brick is broken.
👉 Found Water Leaks? Get Expert Guidance Before Minor Issues Become Major Repairs.
If you are seeing damp marks on your wall or ceiling but are not sure how big the problem is, you can contact Construction Estimator India on WhatsApp / Call +91 8630676890 for practical guidance on repair scope and budget.
Understanding the anatomy of your home’s water management system—from the roof slope to the internal plumbing lines—is the first step toward a dry, healthy living environment. This guide will walk you through the identification of visible and hidden signs, the process of isolating the source, and the specific repair methodologies required for long-term protection. By following a structured plan, you can avoid the “quick-fix” trap and ensure that your home remains a safe haven for your family.
Recognise the Signs of Water Leaks in Walls and Roof
Visible Signs on Walls
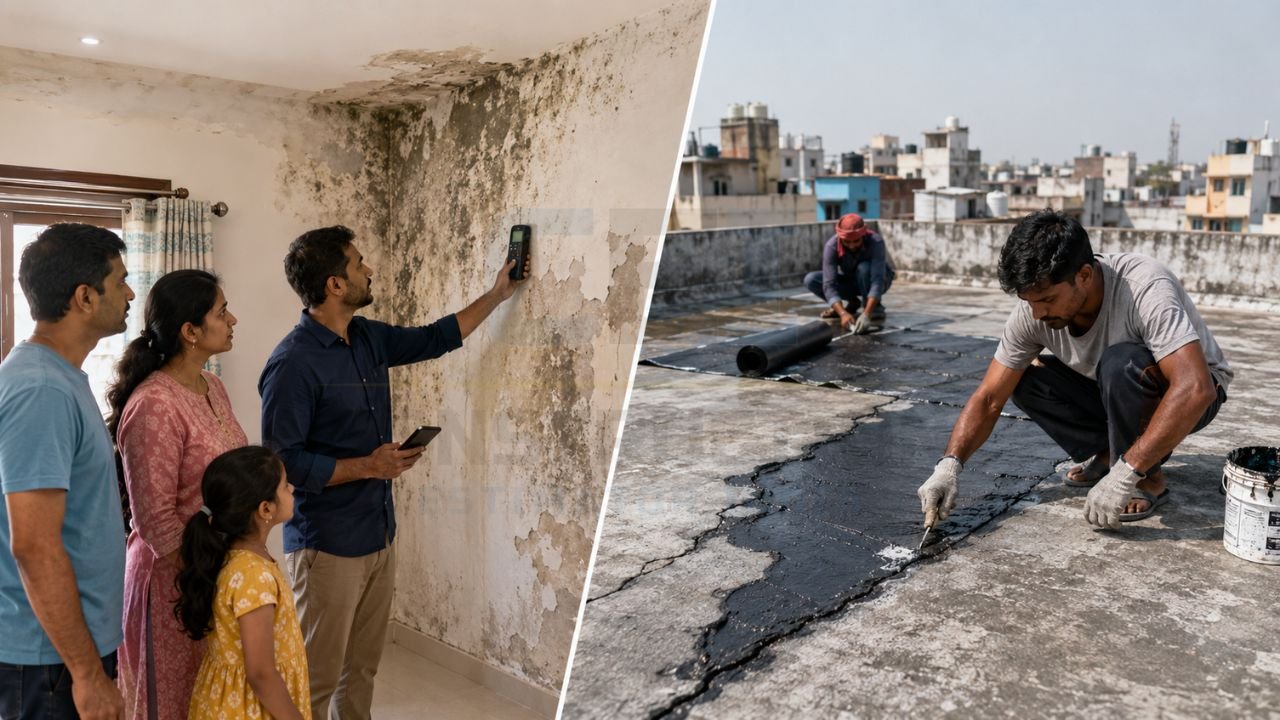
Visible damage on walls often begins subtly but progresses into unsightly and destructive patterns. One of the most common signs in Indian homes is “efflorescence.” This refers to the white, salty, powdery deposits that appear on the surface of brickwork or plaster. It occurs when water dissolves minerals within the building materials and carries them to the surface as it evaporates. When you see this white powder, it is a definitive indicator that moisture is moving through the wall.
Another major sign is the bubbling or peeling of paint. As moisture builds up behind the paint film, it breaks the bond between the paint and the plaster. This is often accompanied by “damp patches”—darker, cooler areas of the wall that feel slightly moist to the touch. In more severe cases, you may notice hairline cracks that seem to “bleed” rust-colored or dark water. Identifying these signs early is crucial because moisture trapped in walls can weaken the plaster, eventually leading to large sections of the wall falling off.
Practical Actions:
- Touch the Surface: Run your hand over the affected area. If it feels significantly colder than the rest of the wall, moisture is present.
- Inspect the Paint: Check if the paint feels brittle or “puffy.” Use a small scraper to see if it flakes off easily, revealing damp plaster underneath.
- Look for Salt: Brush off any white powder. If it returns within a few days, the leak is active.
Common Mistake: Many homeowners simply scrape the peeling paint and apply a fresh coat immediately. Without addressing the moisture source, the new paint will peel again within weeks.
👉 Protect Your Home by Identifying and Fixing Water Leaks at the Earliest Stage.
Visible Signs on Ceilings and Roof
Ceiling leaks are often more urgent as they can affect electrical fixtures and structural slabs. Knowing what is RCC construction helps you understand how water pools on concrete surfaces. The most recognizable sign is a brown or yellow-ringed stain, often referred to as a “water halo.” These stains are caused by dirty water pooling on the upper surface of the ceiling and soaking through the concrete or gypsum board. If you have a false ceiling, you might notice the panels sagging or changing color before water actually drips onto the floor.
On the roof or terrace, signs of leakage are often found at the “junctions.” Look for “ponding,” where water collects in small pools because the roof slope is incorrect. Check for cracks in the parapet walls (the small walls around the edge of the roof) and the “gola” (the curved cement moulding at the base of the wall). If the gola is cracked, rainwater will seep directly into the joint between the slab and the wall.
Practical Actions:
- Map the Stain: Use a pencil to lightly trace the edge of a ceiling stain. If the stain grows past the line after a rainstorm, it is a roof leak. If it grows consistently every day, it is likely a plumbing leak.
- Check Roof Drainage: During rain, see if water is flowing freely into the drainage pipes. Any blockage causes water to back up and find its way into structural cracks.
- Examine Electrical Points: Look for moisture around fan hooks or recessed lights, as water often follows electrical conduits.
Risk Point: Standing water on a terrace adds significant weight and constant hydrostatic pressure, forcing water through even the smallest pores in the concrete. If you suspect hidden water leaks but are not sure how serious they are, you can contact Construction Estimator India on WhatsApp / Call +91 8630676890 for a practical cost estimation and repair planning discussion.
Hidden Signs: Smell, Mold, and Indoor Comfort Changes
Not all water leaks in walls and roof structures are visible to the naked eye. Often, the first sign is a sensory change. A persistent “musty odor” is a classic indicator of mold and mildew growth hidden behind wardrobes, under floorboards, or inside wall cavities. Mold thrives in dark, damp, and poorly ventilated spaces. It appears as small black, green, or grey spots and can cause respiratory issues or allergic reactions for residents.
Additionally, you might notice a sudden increase in indoor humidity. If a room feels “heavy” or “damp” even when the windows are closed, there may be significant moisture ingress. Another hidden sign is the unexpected presence of pests. Termites, silverfish, and certain types of beetles are attracted to damp wood and wet masonry. If you see termite mud tubes near a wall that seems otherwise fine, it might be because the wall is holding enough moisture to support a colony.
Practical Actions:
- The Smell Test: Close a room for a few hours and then enter. If you are hit with a “wet basement” smell, there is trapped moisture.
- Move Furniture: Pull wardrobes or beds away from external walls. Check the back panels for mold or dampness.
- Check the Floor: In some cases, dampness from the walls seeps under tiles, causing them to sound “hollow” when tapped or making the grout lines turn dark.
Common Mistake: Using air fresheners to mask the musty smell. This ignores the biological growth (mold) that is actively damaging your home’s air quality and structure.
Find Out Where the Leak Is Coming From (Source Identification)
Distinguish Plumbing Leaks from Rainwater Leaks
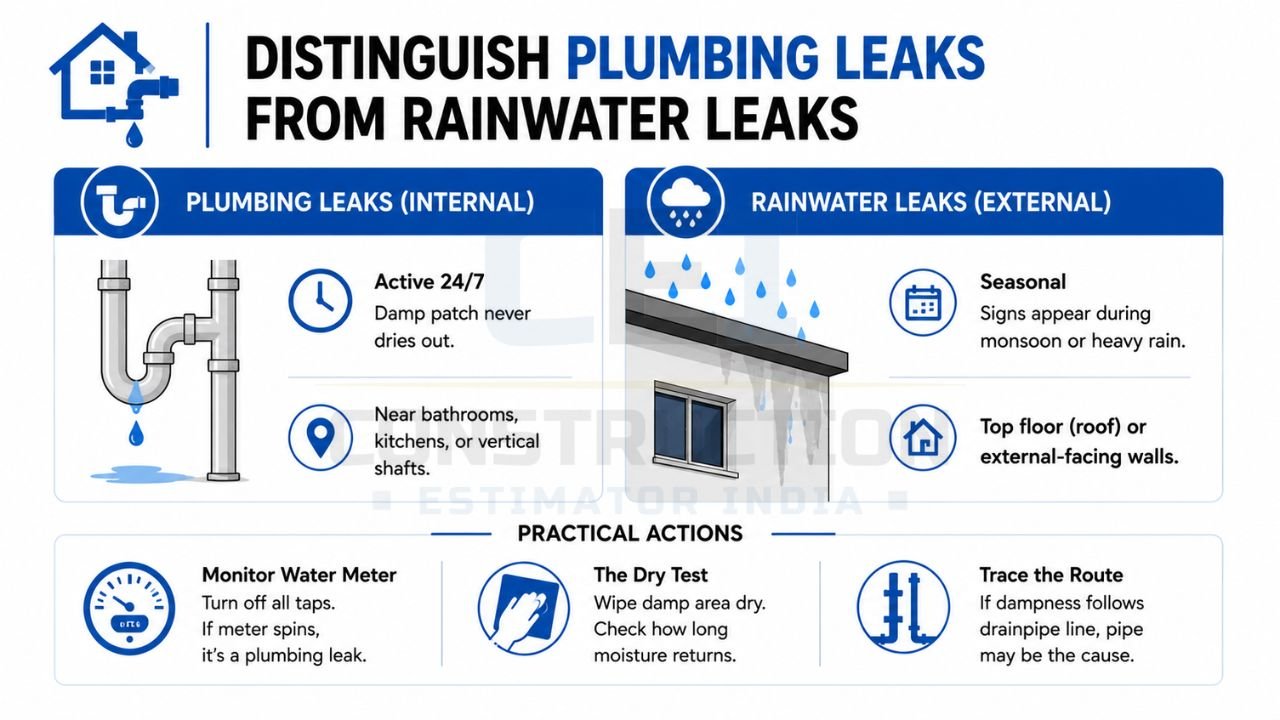
To fix a leak, you must first know if the culprit is “external” (rain) or “internal” (pipes). This distinction is vital for choosing the right professional. Plumbing leaks are typically “active” 24/7. Because the water lines are under pressure, a leaking pipe will cause a damp patch that never dries out, regardless of the weather. These leaks often appear near bathrooms, kitchens, or the vertical shafts (ducts) where main supply lines run.
Rainwater leaks, on the other hand, are “seasonal.” You will notice the signs appearing or worsening during the monsoon or after a heavy storm, and they may appear to dry out or “fade” during the hot summer months. These leaks are usually found on the top floor (from the roof) or on external-facing walls where rain beats against the building.
Practical Actions:
- Monitor the Water Meter: Turn off all taps in the house. If the water meter continues to spin, you have a plumbing leak.
- The Dry Test: Wipe a damp area dry and see how long it takes for moisture to return. If it happens while someone is taking a shower in the room above, the source is clear.
- Trace the Route: Look at the building’s external plumbing map. If the dampness follows the vertical line of a drainpipe, the pipe may have a crack or a loose joint.
Simple Cost Indicator: Plumbing repairs often involve breaking tiles, which increases the “restoration” cost beyond just the pipe repair. Construction Estimator India can help you account for these secondary costs.
👉 Need Help Finding the Source of a Leak? Consult Our Waterproofing Experts Today.
Check Roof, Terrace, and External Walls
If you have determined the leak is rainwater-related, a thorough inspection of the building’s exterior is required. For the roof, pay close attention to the “rainwater outlets.” Leaves, plastic waste, or construction debris often block these outlets, causing water to accumulate on the slab. Check the “expansion joints” in larger buildings; these are designed to allow for thermal movement but are common failure points for waterproofing membranes.
External walls in India are often subjected to “wind-driven rain.” If the external plaster has hairline cracks, the rain is forced into these gaps. Over time, this saturates the brickwork. Inspect the areas around window frames and “chajjas” (window overhangs). If the sealant between the window frame and the wall has perished, water will enter every time it rains.
Practical Actions:
- Inspect Outlets: Ensure the grating on rainwater pipes is clear.
- Look for Vertical Cracks: Check the external facade for long vertical cracks, which may indicate structural settling that has broken the waterproof barrier.
- Examine the ‘Gola’: Ensure the cement curve at the wall-floor junction on the terrace is intact and not pulling away from the wall.
Common Mistake: Assuming that a leak directly below a spot on the terrace means the crack is right there. Water can travel 10–20 feet horizontally along a slab before finding a way down. Before you start breaking plaster or repainting, Construction Estimator India can help you estimate the cost of leak repair and waterproofing. Reach out on WhatsApp / Call +91 8630676890.
Use Simple Tools and Observations
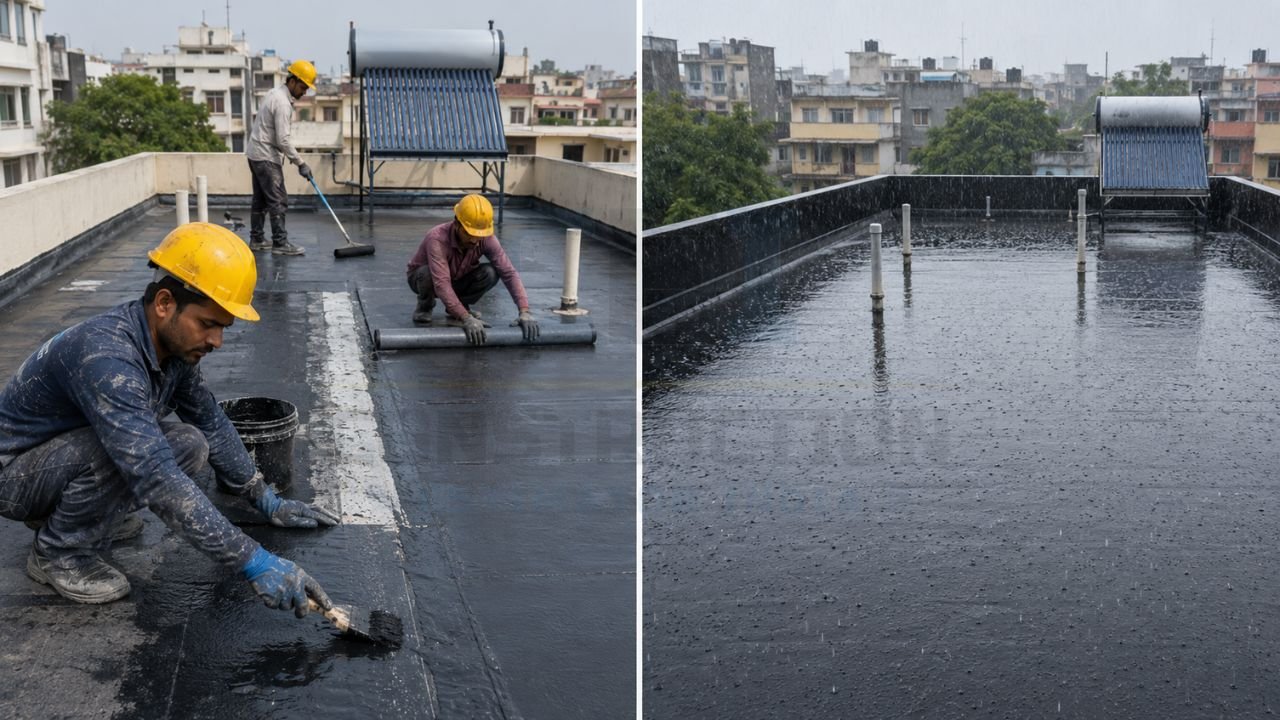
You don’t always need high-tech thermal cameras to find a leak. A “bucket test” is a very effective DIY method for terrace leak detection. Clean the terrace and block the drainage outlets. Fill the terrace with 2–3 inches of water and leave it for 24–48 hours. If the dampness in the rooms below increases significantly, the terrace waterproofing has failed.
Another tool is a “moisture meter.” These are relatively inexpensive devices that measure the electrical resistance in the wall to give you a moisture percentage. Anything above 15-20% in a dry season is a cause for concern. You can also use “masking tape” to track the progress of a damp patch. Place tape at the current edge of the moisture; if the wet area moves past the tape, the leak is actively expanding.
Practical Actions:
- Perform the Flood Test: As described above, but ensure your building structure can handle the weight of the water.
- Time the Leak: Note if the ceiling starts dripping exactly 10 minutes after a shower starts or 2 hours after rain begins. This timing helps professionals pinpoint the distance of the source.
- Photo Documentation: Take photos daily from the same angle to show the contractor how the leak behaves over time.
Estimation Support: You can share photos and basic room details with Construction Estimator India to get a rough idea of repair scope and budget for wall and roof leakage issues. This roof waterproofing and repair cost estimation service is invaluable for setting a realistic budget.
Immediate Damage Control Before Major Repair
Temporary Measures for Active Drips and Damp Patches
When a leak becomes an active drip, immediate action is required to prevent further damage to your furniture and flooring. If water is dripping from a ceiling, find the “lowest point” of the sag and, if it is a drywall/false ceiling, consider poking a small hole with a screwdriver. This may sound counterintuitive, but it directs the water to a single point where you can catch it in a bucket, preventing the water from spreading horizontally and collapsing the entire ceiling panel.
For damp walls, move any wooden furniture, curtains, or electrical appliances away from the affected area. Wood absorbs moisture and will warp or rot if left in contact with a damp wall. Use fans or a dehumidifier to circulate air; this won’t fix the leak, but it can slow down the growth of mold and help the surface layer of plaster stay slightly drier.
Practical Actions:
- The Bucket and String Method: If water is running down a beam, tie a piece of string to the leak point and lead it into a bucket. The water will follow the string, preventing splashing.
- Plastic Sheeting: Cover electronic items and expensive rugs with heavy-duty plastic sheets.
- Ventilation: Keep windows open during dry intervals to reduce the indoor “greenhouse effect” caused by evaporating moisture.
Risk Point: Do not attempt to “patch” an active leak with waterproof putty from the inside. The water pressure will eventually push the patch off or simply move the leak to a different spot.
Safety Precautions Around Electricity and Structure
Water and electricity are a lethal combination. If you notice moisture near switchboards, plug points, or ceiling lights, go to your main distribution board (MCB) and switch off the power to that specific circuit immediately. Do not attempt to use any electrical appliance that has been in contact with water until it has been professionally inspected.
From a structural perspective, be cautious of “bulging” plaster or sagging ceilings. A concrete slab rarely collapses suddenly due to a leak, but heavy plaster or false ceiling boards can fall without warning. If you see significant cracks widening or a portion of the ceiling looking “heavy,” evacuate that area of the room. Also, never climb onto a wet roof during a storm to check for leaks; the surface can be incredibly slippery, and the risk of a fall is high.
Practical Actions:
- Isolate Power: Identify which breakers control the damp walls and keep them OFF.
- Clear the Path: Ensure the area beneath a leaking ceiling is clear of people and pets.
- Avoid DIY Height Work: Wait for dry weather and use proper safety gear before inspecting the terrace or roof.
Common Mistake: Touching a damp wall near a switchboard with bare hands. Always use a non-conductive tester if you suspect electrical leakage.
When to Call a Plumber, Roofer, or Estimator Quickly
Not every leak is a DIY job. You should call a professional immediately if:
- Water is gushing or spraying (indicating a burst pipe).
- There is a smell of burning or sparks near damp areas.
- The leak is causing structural cracks to appear in the beams or columns.
- The dampness is affecting a shared wall with a neighbor (which can lead to legal disputes).
While a plumber fixes pipes and a roofer fixes the terrace, Construction Estimator India acts as your strategic consultant. They help you understand the entire scope. For instance, a plumber might fix a pipe for ₹2,400, but the cost to replace the broken tiles, waterproof the sunken slab, and repaint the room might be ₹24,000. Construction Estimator India provides the full picture so you aren’t surprised by the final bill.
When to Contact the Estimator:
- After the immediate source is identified but before you hire a contractor.
- When you receive a quote from a contractor that seems unusually high or low.
- When planning a full renovation triggered by water damage.
Construction Estimator India helps homeowners and small builders estimate the cost of diagnosing and repairing water leaks in walls and roofs, ensuring you pay a fair price for quality work.
Fixing Wall Leaks – Repair and Waterproofing Options
Repairing Plumbing-Related Wall Leaks
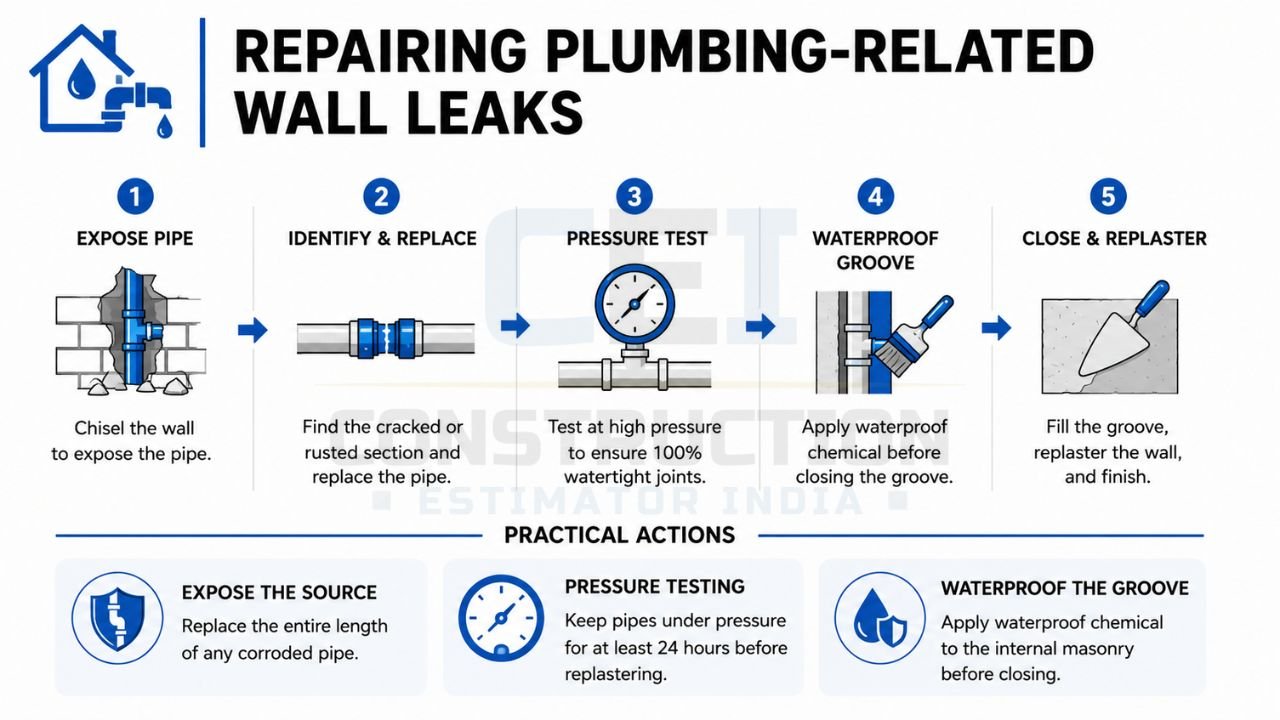
If the source is a leaking pipe, the repair must be permanent. In older Indian homes, GI (Galvanised Iron) pipes are common, and these often rust from the inside out. Modern repairs typically involve replacing these with CPVC or UPVC pipes. The process involves “chiselling” the wall to expose the pipe, identifying the cracked joint or rusted section, and replacing it.
After the pipe is replaced, it is critical to perform a “pressure test.” This involves plugging the outlets and pumping water at high pressure to ensure the new joints are 100% watertight before the wall is closed back up. This is a step often skipped by local handymen, leading to recurring leaks.
Practical Actions:
- Expose the Source: Don’t just patch the leak; replace the entire length of the pipe if it shows signs of widespread corrosion.
- Pressure Testing: Ask your plumber to keep the pipes under pressure for at least 24 hours before replastering.
- Waterproof the Groove: Before filling the pipe groove with cement, apply a coat of waterproof chemical to the internal masonry.
Typical Timeline: 1–3 days for pipe repair and testing. Construction Estimator India can provide construction estimating services for home repair to help you budget for the skilled labor required.
👉 Protect Your Home from Seepage, Dampness, and Water Damage with Expert Support.
Repairing Damp External Walls
External walls require a “barrier” approach. The first step is to fill all visible cracks using a “crack-fill” paste. For larger cracks, a technique called “v-groove” cutting is used, where the crack is widened into a ‘V’ shape, cleaned, and filled with non-shrink grout or polymer-modified mortar.
Once the cracks are sealed, the entire wall should be treated with an external waterproof coating. Unlike regular paint, these coatings are “elastomeric,” meaning they can stretch and contract with the building’s thermal movement without cracking. In severe cases of “rising damp” (where water travels up from the ground), a “Damp Proof Course” (DPC) may need to be injected or repaired at the plinth level.
Practical Actions:
- Surface Preparation: The wall must be cleaned of all fungus, algae, and loose dust using a wire brush or high-pressure water jet.
- Crack Filling: Use high-quality polymer fillers. Avoid using plain white cement without knowing exactly how to use white cement for waterproofing in India, as untreated cement is brittle and will crack again.
- Coat Application: Apply at least two coats of the waterproof exterior coating, following the manufacturer’s recommended “spreading rate” (how much area one liter covers).
Risk Point: Applying waterproof paint over a wet wall. The moisture trapped inside will turn into vapor in the sun and cause the new coating to blister.
Internal Wall Treatment and Repainting After Leak Repair
Once the external source or plumbing is fixed, the internal wall needs restoration. Often tackled during a larger house renovation, you must wait for the wall to “dry out” completely. This can take anywhere from two weeks to a month depending on the severity. If you paint too early, the moisture will ruin the finish.
The process involves scraping off all loose paint and “putty.” If the plaster is “hollow” or crumbly, it must be removed and redone using waterproof mortar (cement mixed with a liquid waterproofing compound). For the finishing touch, use an “anti-dampness” primer which acts as a secondary shield before the final interior emulsion paint is applied.
Practical Actions:
- Scraping: Use a putty blade to remove everything down to the bare plaster.
- Sanding: Sand the surface to create a “key” for the new materials to bond to.
- Putty Application: Use a water-resistant wall putty. Apply in thin layers, allowing each to dry.
- Final Painting: Choose a high-quality emulsion.
Common Mistake: Using cheap chalk-based putty in a damp-prone area. It acts like a sponge and will fail quickly. For a detailed guide, refer to this detailed explanation of wall dampness causes and prevention.
Fixing Roof Leaks – Terrace and Roof Solutions
Basic Roof Repair: Cracks, Joints, and Slope Correction
Many roof leaks in Indian homes are caused by poor “slope.” If water does not flow quickly toward the drains, it stays on the roof and finds microscopic cracks in the concrete. Slope correction involves adding a “screed” (a thin layer of cement and sand) to redirect the water.
Cracks on the roof are handled similarly to walls but require tougher materials because of the direct sun exposure. The “expansion joints”—the gaps left between different sections of a large building—are particularly vulnerable. These must be filled with “backing rods” and high-grade sealants conforming to Bureau of Indian Standards (BIS) guidelines that can handle constant movement and UV rays.
Practical Actions:
- Check the Slope: Pour a bucket of water on the terrace. If it doesn’t move toward the drain within seconds, your slope needs correction.
- Clean the Joints: Remove old, dried-out sealant from joints before applying new material.
- Repair the ‘Gola’: Re-do the curved cement moulding at the base of the parapet walls using a waterproof additive.
Cost Indicator: Slope correction is labor-intensive and requires significant cement and sand. Construction Estimator India can help you calculate the exact quantity of materials needed.
Waterproofing Systems for Roofs
When a simple patch-up isn’t enough, a full waterproofing system is required. There are several common types:
- Cementitious Coatings: A mixture of cement and liquid polymers. Easy to apply and cost-effective.
- Liquid Applied Membranes: These create a rubber-like, seamless layer over the entire roof. They are very durable and excellent for roofs with many corners or pipes.
- Bituminous Membranes: These are “rolls” of tar-based material that are torched or glued onto the roof. They are traditional and very effective for large, flat areas.
Each system has its pros and cons. Liquid membranes are popular for modern homes because they are “breathable” and easy to maintain. Bituminous membranes are tough but require skilled applicators to ensure the “laps” (where the rolls overlap) are perfectly sealed.
Practical Actions:
- Choose Based on Usage: If you walk on your roof often, choose a “trafficable” coating that won’t wear away underfoot.
- Fiber Mesh Reinforcement: Always embed a glass-fiber mesh between coats of liquid membranes to add strength and prevent cracking.
- Pond Test Again: After the waterproofing is done, perform a 24-hour flood test before laying any protective tiles or screed.
Common Mistake: Choosing the cheapest material without checking if it is UV-resistant. Non-UV coatings will turn brittle and crack under the Indian summer sun within one season.
👉 Get Reliable Solutions for Wall and Roof Leaks from Experienced Professionals.
Drainage, Gutters, and Parapet Wall Junctions
A waterproof roof is useless if the drainage fails. Many leaks occur at the “mouth” of the rainwater pipe. If the pipe is not properly sealed into the slab, water will leak into the ceiling around the pipe rather than going through it. Similarly, “parapet walls” are often ignored. These walls soak up rain and the moisture travels downward into the main slab.
Installing proper gutters on sloped roofs and ensuring the drainage pipes are of a sufficient diameter (at least 4 inches for most Indian bungalows) is essential. Adding “rainwater gratings” or “domes” to the pipe inlets prevents leaves and debris from causing a blockage that leads to roof flooding.
Practical Actions:
- Seal Pipe Inlets: Use a non-shrink waterproof grout around the area where the plastic pipe meets the concrete slab.
- Waterproof the Parapet: Don’t just paint the inside of the parapet wall; waterproof the top (the “coping”) and the outside as well.
- Check Overhangs: Ensure “drip grooves” (small channels under the edge of a slab) are clean, preventing water from “crawling” back toward the wall.
Proactive Advice: For more technical details, consult this guide on spotting hidden water leaks in walls.
Planning Cost, Materials, and Contractors
Factors That Affect Leak Repair and Waterproofing Cost
The budget for fixing water leaks in walls and roof is influenced by several variables. The first is “accessibility”—repairing a 4th-floor external wall requires scaffolding, which adds significant cost. The second is the “system type.” A basic cementitious coating is cheaper than a high-end PU membrane. Understanding your baseline house construction per sq ft rate can help frame these costs.
The “severity of damage” also matters. If the concrete slab has started “spalling” (where the internal steel bars have rusted and are pushing the concrete off), you will need structural repairs using “epoxy injections” or “micro-concrete,” which are more expensive than standard waterproofing. Finally, the “reinstatement” cost—replacing expensive Italian marble or designer tiles broken during plumbing repair—can often exceed the cost of the leak fix itself.
Cost Factors:
- Surface Area: Measured in square feet.
- Labor Expertise: Skilled waterproofing applicators charge a premium over general masonry workers.
- Material Quality: Branded chemicals vs. local substitutes.
- Warranty Requirements: Contractors offering a 5–10 year “no-leakage” guarantee will charge more to cover their risk.
Construction Estimator India provides guidance on waterproofing, crack repair, repainting, and related construction quantities to help you navigate these costs.
Choosing the Right Contractor or Applicator
In the Indian construction market, “guarantees” are often given verbally but rarely honored. Engaging certified building contractors ensures they follow Central Public Works Department (CPWD) standards and use proper materials like those from Dr. Fixit or Sika. Ask for a “Method Statement”—a written document explaining exactly how they will clean the surface, which chemicals they will use, and how many coats will be applied.
Avoid contractors who suggest “fixing it from the inside” for a roof leak. This is a temporary fix that traps water inside the slab, eventually causing the steel reinforcement to rust. A good applicator will always insist on a “flood test” and will be happy to show you “Product Data Sheets” (PDS) for the chemicals they are using.
Checklist for Contractors:
- Previous Work: Ask for references of homes they waterproofed 2–3 years ago. If those homes are still dry, the contractor is good.
- Written Quote: Ensure the quote includes surface preparation, material brands, and debris removal.
- Payment Terms: Never pay 100% upfront. Tie payments to milestones (e.g., after surface prep, after 1st coat, after successful flood test).
Construction Estimator India can help you evaluate these quotes to ensure the quantities and rates are justified for the Indian market.
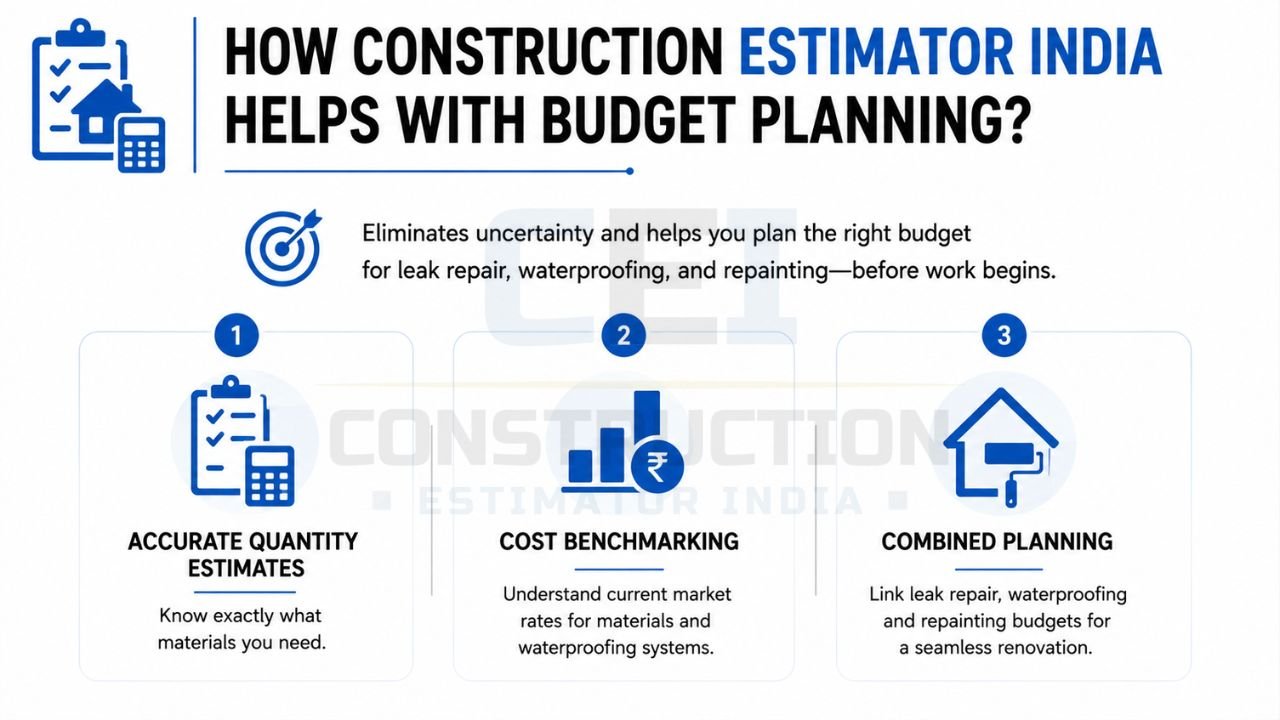
How Construction Estimator India Helps with Budget Planning?
One of the biggest frustrations for homeowners is “scope creep”—when a small repair turns into a massive, expensive project because the initial plan was poor. Construction Estimator India eliminates this uncertainty. By analyzing your photos, drawings, or site details, they provide a “Quantity Takeoff.” Calculate exactly how much you need, helping you pinpoint the exact plaster cost per square foot with material in India, liters of waterproof chemical, and square feet of paint required.
They also offer support for planning complete repair + waterproofing + repainting budgets before work begins. This allows you to negotiate with contractors from a position of knowledge. You will know if a contractor is overcharging for materials or underestimating the labor required.
Services Provided:
- Accurate Quantity Estimates: Know exactly what to buy.
- Cost Benchmarking: Understand the current market rates for different waterproofing systems.
- Combined Planning: Link your leak repair with your repainting budget for a seamless renovation.
Before you start breaking plaster or repainting, Construction Estimator India can help you estimate the cost of leak repair and waterproofing. Reach out on WhatsApp / Call +91 8630676890.
Maintenance and Prevention: Keep Future Leaks Away
Regular Checks and Simple Maintenance Habits
Prevention is always cheaper than a cure. A simple habit is to inspect your roof and external walls twice a year: once before the monsoon (April/May) and once after (October/November). Clear any debris from the roof, check for new cracks, and ensure the sealant around window frames is still pliable.
Inside the home, keep an eye on the “grout” in bathroom tiles. If the grout is missing or cracked, water from your daily shower will seep into the floor slab, eventually causing dampness in the ceiling below or in the adjacent room’s walls. Re-grouting your bathroom every 2–3 years is a low-cost way to prevent major plumbing-related wall leaks.
Practical Actions:
- Clean the Drains: Remove dust and plastic waste from terrace outlets.
- Trim Trees: Ensure branches are not touching the roof, as they can damage the waterproof coating and drop leaves that block drains.
- Check the Tank: Inspect your overhead water tank for cracks or overflow issues.
Typical Timeline: A full house inspection takes only about 2 hours but can save lakhs in repair costs.
👉 Don’t Let Hidden Leaks Compromise Your Home’s Safety and Value.
Design and Construction Good Practices
If you are building a new home or doing a major renovation, insist on “good detailing.” This includes ensuring the “sunken slabs” in bathrooms are waterproofed before the pipes are laid. The use of “integral waterproofing” (chemicals mixed directly into the concrete during the casting of the roof) is also highly recommended.
Ensure your architect or builder provides a “drip mold” on all chajjas and balcony edges. This simple groove prevents water from running along the underside of the slab and reaching the wall. Proper “curing” of new plaster is also vital; if plaster dries too quickly, it develops “shrinkage cracks” that act as entry points for moisture later.
Best Practices:
- Proper Slopes: Aim for a 1:100 slope on terraces.
- Quality Plumbing: Use branded pipes and avoid unnecessary joints hidden inside walls.
- Waterproof Mortar: Use waterproof additives in all external plastering work.
Estimation Support: Construction Estimator India provides home renovation quantity takeoff support for new builds to ensure these preventive measures are included in your initial budget.
When to Schedule Professional Inspection
While DIY checks are great, a professional inspection is recommended every 5 years or when you notice a “cluster” of problems appearing simultaneously. If you are planning to repaint your entire house, always do a moisture check first. Painting over a hidden leak is the most common way homeowners waste money in India.
Professional inspectors use tools like thermal imaging cameras to “see” water inside walls without breaking them. They can identify cold spots that indicate a slow-leaking pipe or a failing external seal. If you are buying or renting a property, a professional assessment can protect you from inheriting someone else’s expensive water damage problems.
When to call a pro:
- Before the monsoon season.
- Before a major interior design or painting project.
- If you notice a sudden, unexplained increase in your water bill.
If you suspect hidden water leaks but are not sure how serious they are, you can contact Construction Estimator India on WhatsApp / Call +91 8630676890 for a practical cost estimation and repair planning discussion.
Common Mistakes When Dealing With Water Leaks
Only Repainting Without Fixing the Root Cause
This is the “#1 mistake” in Indian home maintenance. Homeowners often treat water leaks as a “cosmetic” problem. They see a damp patch, get annoyed by the peeling paint, and call a painter to “touch it up.” The painter scrapes the area, puts some putty, and repaints.
Within a few months—especially during the next rain—the paint bubbles again. This is because the water is still inside the wall. The new paint acts as a vapor barrier, trapping the moisture until the pressure causes the paint to peel off. You must find and stop the water ingress before you even think about a paintbrush.
How to avoid: Always ask “Where is the water coming from?” and fix that source first.
Using Quick-Fix Products Without Proper Surface Preparation
The market is flooded with “DIY waterproofing” sprays and pastes. While some are good for minor issues, they fail if the surface isn’t prepared correctly. Applying a waterproof sealant over dust, oil, or old fungus is useless; the sealant will bond to the dust, not the wall, and will peel off shortly.
Most high-quality waterproofing systems require the surface to be “SSD” (Saturated Surface Dry)—meaning the concrete is damp but has no standing water on top. Skipping the cleaning, wire-brushing, or priming steps recommended by the manufacturer will lead to total system failure.
How to avoid: Follow the “Technical Data Sheet” of the product exactly, or hire a specialized applicator.
Ignoring Small Leaks Until They Become Major
A small yellow stain on the ceiling is easy and cheap to fix. If ignored, that water will eventually reach the “rebar” (the steel rods inside the concrete). Steel expands when it rusts, which cracks the concrete from the inside out. This is called “concrete spalling” and is a major structural threat.
What could have been a ₹6,000 waterproofing job can quickly become a ₹60,000 structural rehabilitation project. Similarly, slow plumbing leaks can lead to mold growth that ruins your wooden wardrobes and affects your family’s health.
How to avoid: Treat every damp patch as an emergency. Early intervention saves significant money.
Not Documenting the Problem with Photos and Notes
When you call a contractor or an estimator, “it’s leaking” is not enough information. Many homeowners fail to track when the leak happens, how fast it grows, or where it started. Without this “history,” the professional has to guess the source, which can lead to unnecessary breaking of walls.
How to avoid: Start a “Leak Log.” Take photos once a week. Note if the leak is worse after a long shower or after a heavy storm. This data is invaluable for contact Construction Estimator India team to provide you with an accurate estimate.
FAQs: Identifying and Fixing Water Leaks in Walls and Roof
What is the first thing I should do if I see a damp patch on my wall?
The first step is to check if there is any electrical point nearby and turn off the power to that area if it is wet. Then, move furniture away and try to identify if the leak is constant (plumbing) or related to rain.
How do I know if the leak is from the roof or from plumbing?
Plumbing leaks are usually constant and appear near wet areas like bathrooms. Roof leaks only appear or get worse during the monsoon and are usually found on the top floor ceilings or external wall corners.
Can I fix wall dampness permanently with only paint?
No. Paint is a surface finish. If moisture is coming from inside the wall (plumbing) or outside (cracked plaster), the paint will eventually peel. You must fix the source and use a proper waterproofing system before painting.
How long does roof waterproofing usually last?
A well-applied liquid membrane or bituminous system should last 7–10 years. However, this depends on the quality of the material and the skill of the applicator. Regular maintenance like cleaning drains can extend this life.
When should I call a professional instead of trying DIY methods?
If the leak involves the main slab, structural beams, or pressure-line plumbing, call a professional. DIY is suitable for minor crack filling or sealing window gaps, but structural waterproofing requires specialized tools and knowledge.
Who can help me estimate the total cost of fixing leaks and repainting my home?
Construction Estimator India is the ideal partner for this. They provide detailed cost estimations and quantity takeoffs so you can plan your budget and manage your contractors effectively.
Conclusion: Solve Leaks Systematically and Plan Repairs Smartly
Identifying and fixing water leaks in walls and roof structures is a journey that requires patience and a systematic approach. By learning to recognize the early signs—from the white powder of efflorescence to the subtle musty smell of hidden mold—you can catch problems before they become structural threats. Always prioritize finding the true source of the moisture, whether it’s a hidden pipe joint or a poorly sloped terrace, before investing in expensive cosmetic repairs.
The process of damage control, followed by targeted waterproofing and final repainting, ensures a long-term solution that protects your home’s value and your family’s comfort. Remember that in the world of home maintenance, knowledge is power. Understanding the materials and methods used for repair allows you to hire the right contractors and ensure the work is done to a high standard.
If you are planning to fix water leaks in your walls and roof and want help estimating repair and waterproofing costs before you start, you can contact Construction Estimator India on WhatsApp / Call +91 8630676890 for practical estimation and planning support.