Imagine spending lakhs on premium “Silk” emulsion, only to have it peel off six months later because of a hidden hairline crack or a damp patch you ignored. In the Indian construction market of 2026, where luxury finishes are the norm, the quality of your paint job is only as good as the surface beneath it. Whether you are in the humid coastal regions or the dusty plains of Meerut, learning how to repair wall before painting is the single most important step to protecting your investment. Proper wall preparation ensures that your chosen colors look vibrant, adhere perfectly, and last for a decade rather than a single monsoon season.
👉 Need Professional Wall Repair Services Before Interior or Exterior Painting? – 📲 WhatsApp Us Today
At Construction Estimator India, we have analyzed over 500 projects and found that 90% of “failed” paint jobs are caused by poor surface preparation rather than the paint itself. Direct Answer: To repair a wall before painting, you must scrape off loose debris, fix structural or hairline cracks with specialized fillers, patch holes with high-quality putty, treat dampness at the source, and finish with precision sanding and a high-performance primer.
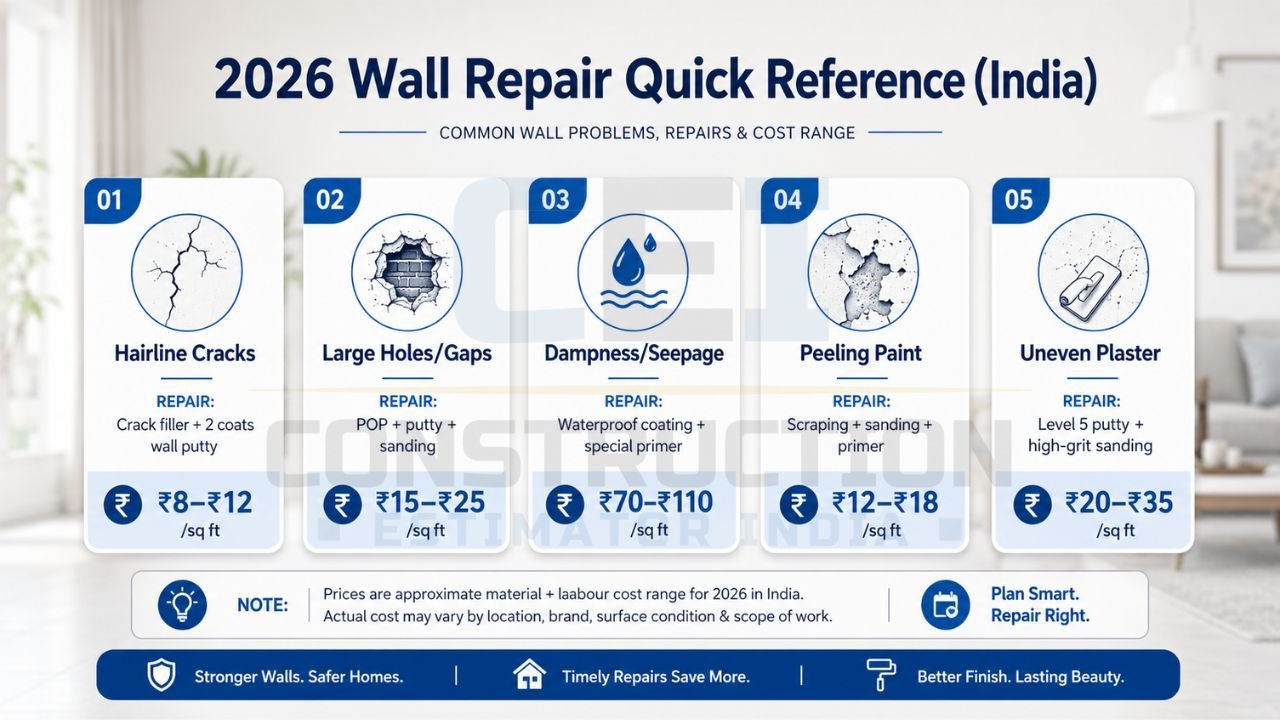
2026 Wall Repair Quick Reference Table
| Damage Type | Recommended Repair Method | Estimated Cost (Labor + Material/sq ft) |
|---|---|---|
| Hairline Cracks | Crack filler + 2 coats of Wall Putty | ₹8 – ₹12 |
| Large Holes/Gaps | POP + Putty + Sanding | ₹15 – ₹25 |
| Dampness/Seepage | Waterproof coating + Specialized Primer | ₹70 – ₹110 |
| Peeling Paint | Scraping + Sanding + Fresh Primer | ₹12 – ₹18 |
| Uneven Plaster | Level 5 Putty + High-grit Sanding | ₹20 – ₹35 |
The Science of Surface Prep: Why Repairs Matter in 2026
In 2026, the Indian paint industry has shifted toward high-performance, low-VOC coatings like “Asian Paints Royale Glitz” and “Berger Silk Breathe Easy”. These paints are beautiful but incredibly thin and unforgiving. If the substrate—your wall—is not perfectly smooth and stable, every imperfection will be magnified under modern LED lighting.
We at Construction Estimator India emphasize that “wall preparation before painting” is not just about aesthetics; it is about chemical adhesion. If you apply premium paint over old, chalky distemper or a dusty surface, the paint will never truly “bite” into the wall, leading to bubbling and flaking within a year. Leveraging our 10+ years of construction estimating expertise, we have seen that skipping a ₹10/sq ft repair today results in a ₹60/sq ft rework tomorrow.
Step-by-Step: How to Repair Wall Before Painting
To achieve a professional result, follow this standardized 2026 protocol used by top-tier contractors across India:
- Clear the Space: Move furniture away and use drop cloths to protect floors.
- Scraping and Cleaning: Use a putty knife to remove loose paint and a stiff brush to clear dust.
- Diagnosis: Identify if cracks are hairline (cosmetic) or deep (structural).
- Filling: Apply the appropriate filler (Putty, POP, or specialized crack paste) in thin layers.
- Drying: Allow 4–6 hours for putty and 24 hours for structural repairs.
- Sanding: Use 180-grit or 320-grit sandpaper for a smooth finish.
- Priming: Apply one coat of primer to seal the repair and ensure uniform paint absorption.
For a precise breakdown of your home, refer to our house construction cost estimation services which include detailed material takeoffs for repairs.
Diagnosing Common Indian Wall Damage
Before you pick up a brush, you must understand what you are fixing. India’s climate creates unique challenges that require specific official 2026 wall repair methods in India.
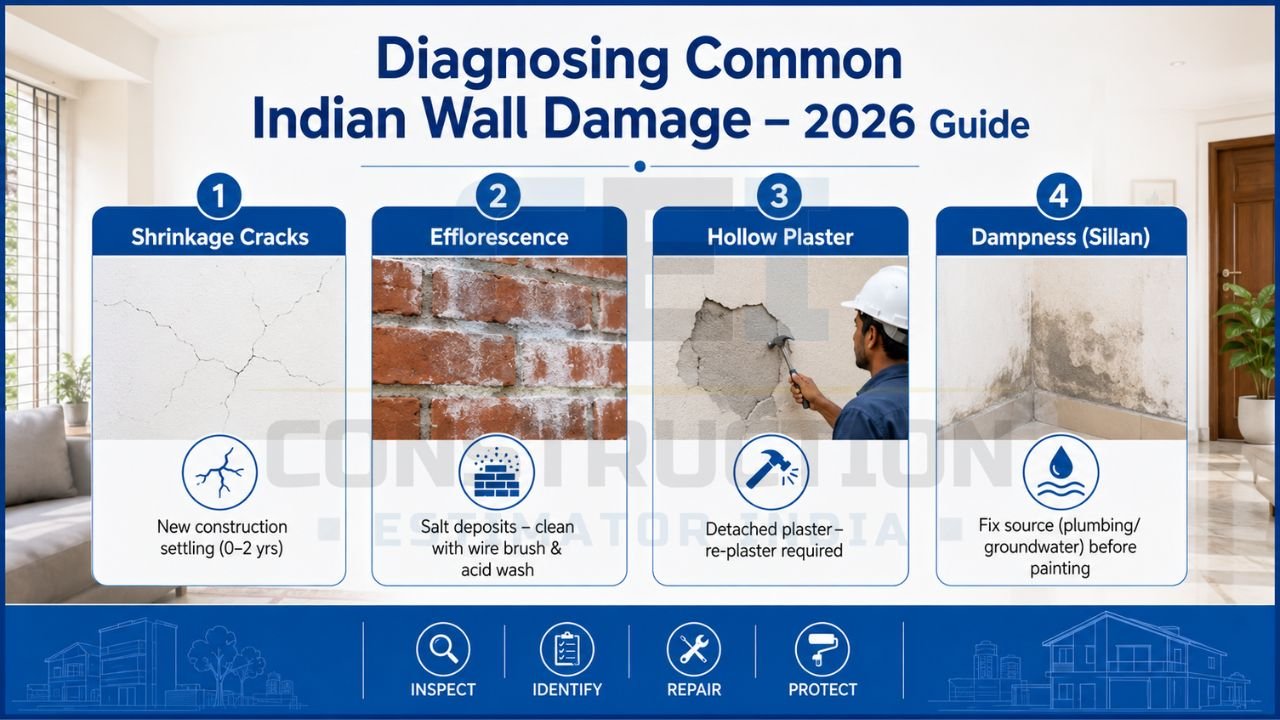
- Shrinkage Cracks: Common in new constructions (less than 2 years old) as the building settles.
- Efflorescence: That white, powdery substance caused by salt in the bricks or water. It must be treated with a wire brush and acid wash before any repair.
- Hollow Plaster: Tap the wall. If it sounds hollow, the plaster has detached from the brick. Patching this is a temporary fix; the section likely needs to be re-plastered.
- Dampness (Sillan): Usually caused by faulty plumbing or rising groundwater. Painting over dampness without fixing the source is a waste of money.
Essential Tools and Materials for Wall Repair
According to the latest 2026 wall repair before painting recommendations by Berger and Nerolac, using the right tools can reduce labor time by 30%.
- Putty Knives: 2-inch and 6-inch versions for various crack sizes.
- Sandpaper: Assorted grits (80 for roughing, 180 for smoothing).
- Wall Putty: White cement-based putty is the standard for 2026 Indian homes.
- Crack Filler: Acrylic-based fillers that remain flexible to prevent future cracking.
- Primer: Water-based for interior and solvent-based for exterior or damp-prone areas.
How to Fix Cracks in Wall Before Painting?
Cracks are the most common reason for homeowner distress. Here is the professional way to fix wall damage before painting:
Hairline Cracks (Cosmetic)
These are usually just in the paint layer.
- Method: Scrape the crack slightly wider to form a ‘V’ shape, fill with wall putty, dry, and sand.
Deep/Structural Cracks
If you can fit a coin in the crack, it needs more than just putty.
- Method: Use a “Crack Seal” compound or a mixture of white cement and resin. For major gaps, use a polymer-modified mortar.
- Expert Tip: If a crack keeps reappearing, it may indicate a structural issue. Consult a structural engineer before investing in expensive professional interior painting estimation services.
Damp Wall Repair Before Painting India 2026
Dampness is the “silent killer” of Indian interiors. In 2026, we recommend a multi-barrier approach.
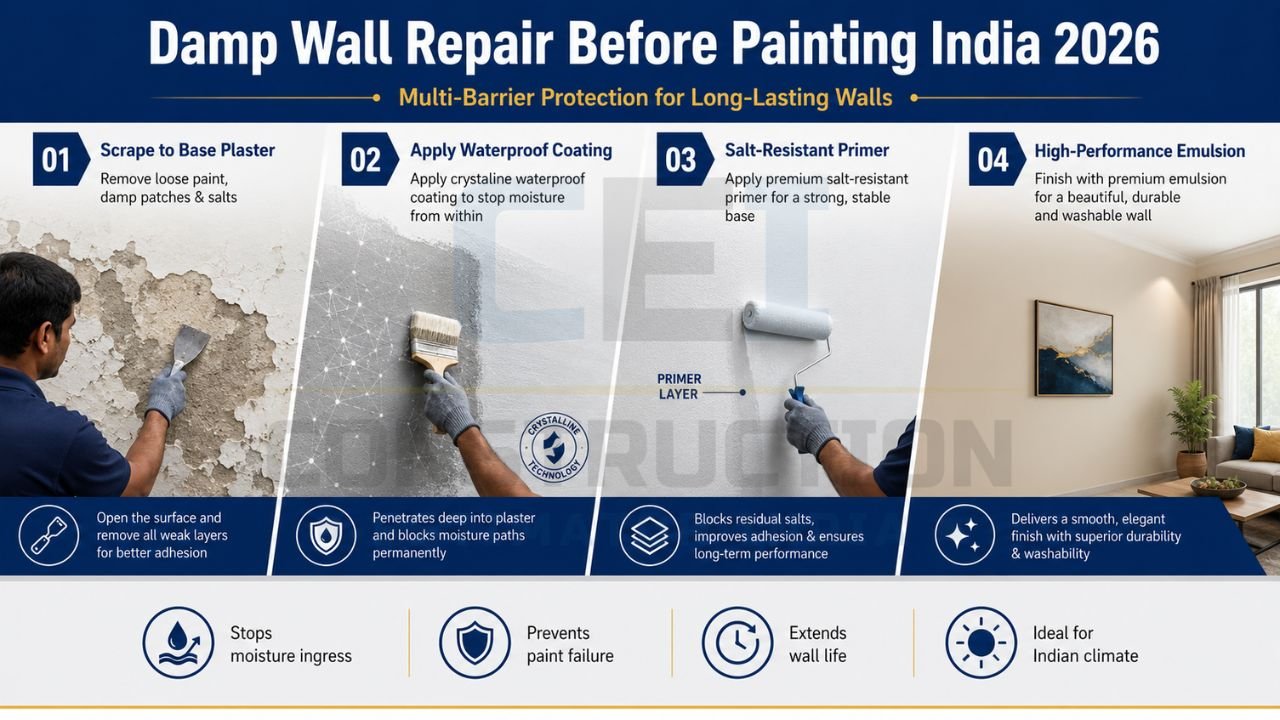
- Step 1: Scrape the wall down to the base plaster.
- Step 2: Apply a crystalline waterproofing coating (like Asian Paints SmartCare Damp Block).
- Step 3: Use a salt-resistant primer.
- Step 4: Finish with a high-performance emulsion.
Refer to the Asian Paints official guide on wall repair before painting 2026 for product-specific application times that prevent moisture trapping.
The Role of Putty and Primer in Your Budget
You cannot ask how to repair wall before painting without factoring in the “hidden” costs of putty and primer. These are the “bones” of your interior painting cost per sq ft in India 2026.
- Wall Putty (2 Coats): Levels the wall and hides minor cracks. Cost: ₹8 – ₹12 per sq ft.
- Wall Primer (1 Coat): Ensures the paint sticks and doesn’t get absorbed by the wall. Cost: ₹4 – ₹7 per sq ft.
If your walls are in “New” condition, you might only need touch-up putty, saving you nearly ₹15 per sq ft on your total project cost.
Vastu Considerations for Wall Repairs
In many Indian homes, wall repairs are a matter of Vastu Shastra. Cracked walls are believed to block “Prana” (energy flow) and cause family instability.

- South-West Walls: Must be heavy and stable. Cracks here should be fixed immediately with yellow-tinted putty to ensure family stability.
- North-East Walls: Should be clean and light. Use white cement-based putty to promote mental clarity.
Expert Tips to Save on Preparation Costs
- DIY Small Holes: Patch small nail holes yourself using a small tub of pre-mixed putty to save on labor “minimum visit” fees.
- Bulk Buy Putty: Buying 40kg bags of putty instead of 5kg packs can save you 20% on material costs.
- Sanding Machines: For large areas, ask your contractor to use an electric sander. It provides a more uniform finish and reduces labor days.
For accurate wall repair cost estimation or full BOQ before painting in India, WhatsApp or call us today at +91 8630676890.
Conclusion
Mastering how to repair wall before painting is the difference between a house that looks “painted” and a home that feels “luxurious.” By taking the time to diagnose damage, choosing the right materials, and following a disciplined repair process, you ensure that your 2026 home renovation stands the test of time and weather.
Whether you are building your “forever home” in Meerut or managing a rental property in Delhi, accuracy in estimation and preparation is your best friend. Don’t leave your project budget to guesswork.
For accurate wall repair cost estimation or full BOQ before painting in India, WhatsApp or call us today at +91 8630676890.
FAQ: People Also Ask
- Can I paint directly over cracks?
No. Paint has zero structural strength. A crack will reappear through the new paint within weeks if not properly filled and sanded. - How long does wall putty take to dry in India?
In the 2026 Indian climate, putty usually takes 4–6 hours to dry. However, during the monsoon, we recommend waiting 12–24 hours before sanding. - Is white cement better than wall putty for repairs?
Wall putty is essentially white cement modified with polymers for better flexibility and a smoother finish. For fine repairs, putty is superior; for large gaps, a white cement mix is more cost-effective. - How much paint per square foot interior is needed after repairs?
A smooth, repaired wall offers higher coverage. Expect 130–150 sq ft per liter for a single coat of premium emulsion on a well-prepared surface. - Why is my paint peeling even after repair?
This is often due to “Metamerism” or moisture. If you didn’t allow the repair to dry fully, the trapped moisture will push the paint off the wall. - What are the CPWD guidelines for wall repairs?
According to CPWD guidelines for proper wall repair before painting, surfaces must be free from efflorescence, dust, and grease, and cracks wider than 1mm must be filled with non-shrink grout.