Picture this: You’ve just removed the formwork from your freshly cast RCC column, expecting a smooth, solid surface—but instead, you see patches that look like a beehive. Exposed stones, hollow gaps, and rough cavities where there should be dense, strong concrete. That’s honeycomb, and it’s one of the costliest quality defects in construction. A single honeycombed column can set you back ₹5,000–₹25,000 in repair costs, delay your project by days, and in severe cases, compromise the structural safety of the entire building. The worst part? Honeycomb is almost always preventable—it’s the result of poor technique, not bad luck.
Whether you’re a contractor managing your first independent project, a site engineer responsible for quality control, or a homeowner building your dream house, understanding honeycomb defects can save you lakhs of rupees and years of headaches. In this comprehensive guide, we’ll explain exactly what honeycomb is, the 10 most common causes on Indian construction sites, how it damages your structure, proven prevention methods, and step-by-step repair techniques for every severity level.
What Exactly Is Honeycomb in Concrete?
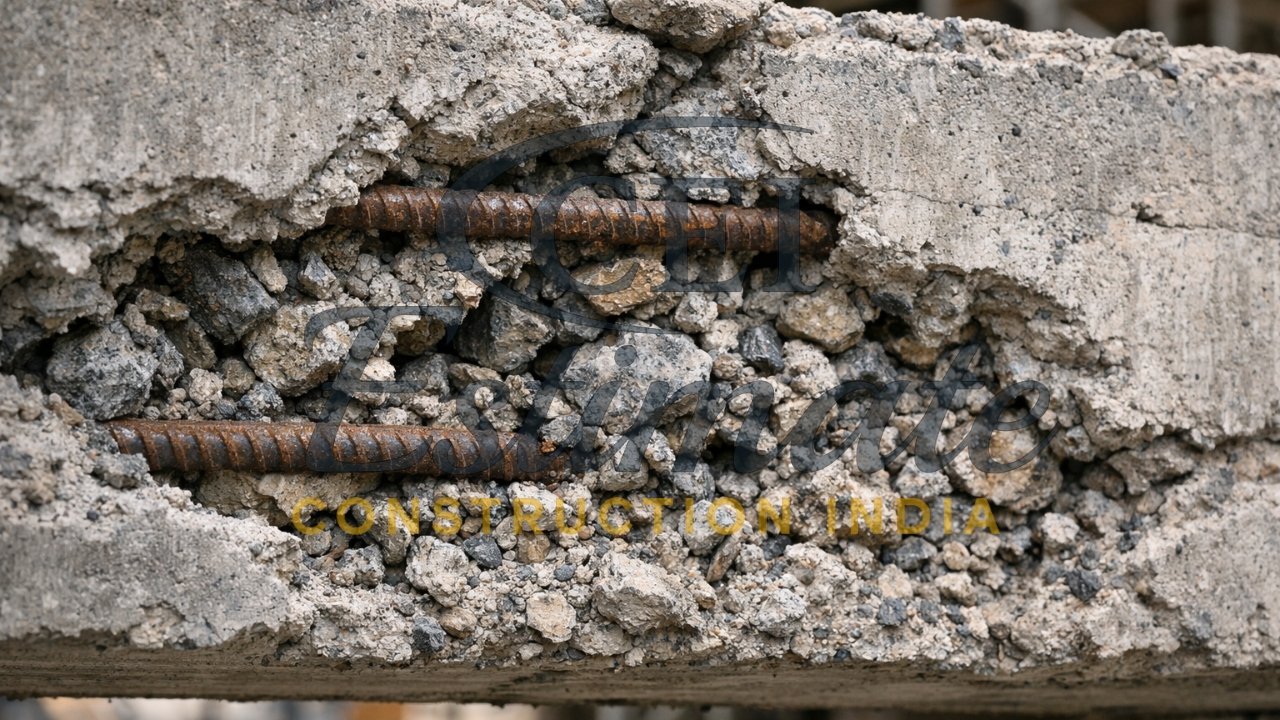
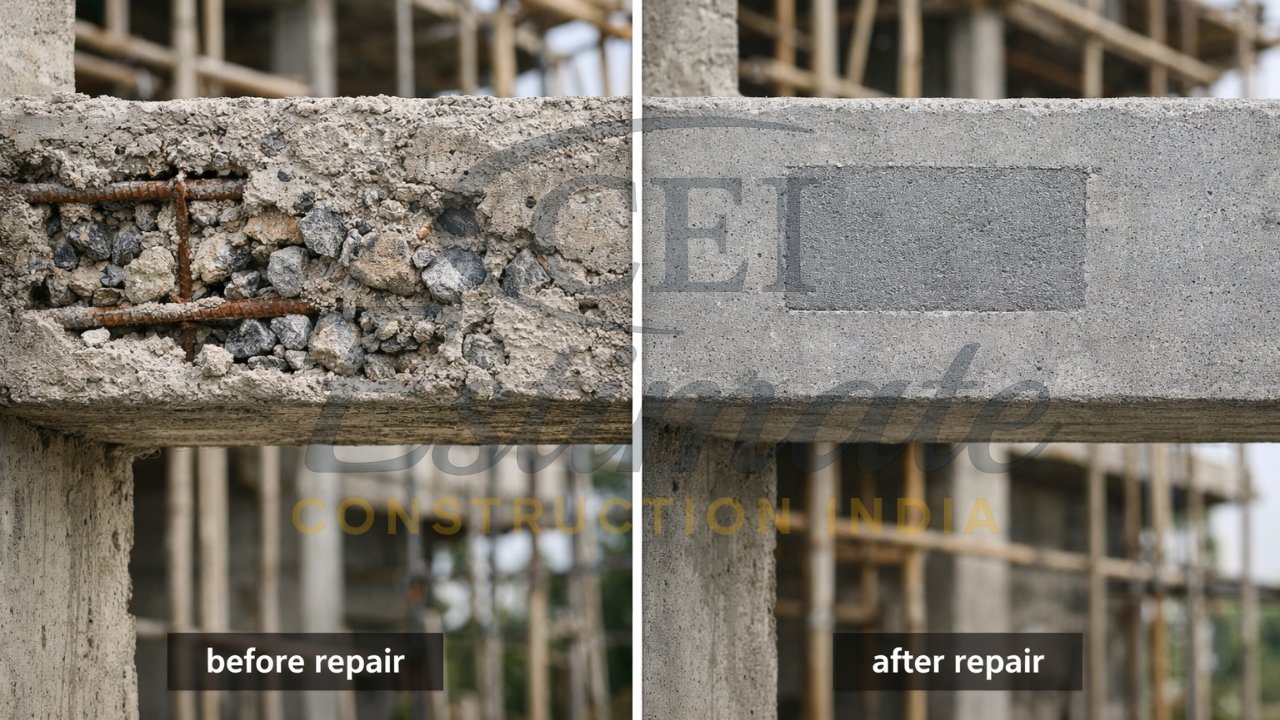
Honeycomb (also called honeycombing or cavitation) is a concrete defect characterized by visible voids, gaps, and exposed coarse aggregates on the surface or within the body of hardened concrete. The name comes from its appearance—the pockmarked surface with interconnected holes resembles a bee’s honeycomb.
Visual Identification
When you spot honeycomb, you’ll typically see:
- Hollow cavities of various sizes (2 mm to 50+ mm diameter) scattered across the concrete surface
- Exposed coarse aggregates (stones/gravel) with little to no cement paste bonding them
- Rough, porous texture instead of smooth, dense concrete
- Gaps between aggregates where cement mortar (fine sand + cement paste) is missing
- In severe cases: visible reinforcement steel bars through deep voids
Where Honeycomb Commonly Appears
- Columns and beams: Especially at bottom sections where concrete settles and near congested reinforcement
- Wall-column junctions: Where rebars are densely packed
- Slab undersides: Due to gravity pulling cement paste downward, leaving voids at top of formwork
- Deep foundations: Where concrete has to travel long distances and vibration is inadequate
- Corners and edges: Where formwork joints leak or vibrator cannot reach
Honeycomb is fundamentally a compaction defect—it means the fresh concrete was not properly consolidated to eliminate air voids and ensure cement paste fills all spaces between aggregates.
Main Causes of Honeycomb in RCC Work (Most Common Mistakes)
Honeycomb doesn’t happen by accident—it’s the result of specific mistakes during concrete mixing, placement, or curing. Here are the 10 most common causes on Indian construction sites:
1. Improper Vibration or Under-Vibration
This is the #1 cause of honeycomb in India. Concrete must be mechanically vibrated (using needle/immersion vibrator) to remove trapped air and ensure cement paste flows into all voids.
Common mistakes:
- No vibration at all (relying on gravity alone)
- Insufficient vibration duration (less than 5–10 seconds per insertion point)
- Wrong vibrator spacing (should be 30–45 cm between insertion points)
- Not vibrating at every layer (for deep pours over 50 cm)
- Using vibrator incorrectly (horizontal movement instead of vertical insertion and slow withdrawal)
Choose Your Construction Services
Connect with verified experts for your project. We provide professional
General Contractors, Sub-contractors, Builders, and Material Suppliers.
Our network also includes specialized 3D Rendering Developers and Interior Experts.
2. High Slump / Excessive Water in Mix
Adding too much water makes concrete flow easily, which seems convenient—but it causes segregation (separation of coarse aggregates from cement paste). When concrete segregates, heavy stones sink to the bottom while watery cement rises, leaving voids between aggregates.
Standard slump for RCC work: 75–100 mm (3–4 inches)
Problem slump: Above 120 mm indicates too much water
3. Congested Reinforcement / Insufficient Clear Spacing
When steel rebars are placed too close together (less than 75 mm clear gap), concrete cannot flow between them, creating honeycomb pockets around the reinforcement.
Common problem areas:
- Beam-column junctions with multiple lapping bars
- Heavily reinforced columns (8–12 main bars with close stirrups)
- Wall-slab connections
Solution: Maintain minimum 75 mm clear spacing between bars, or use self-compacting concrete (SCC) for congested areas.
4. Poor Concrete Mix Design
A mix with insufficient fine aggregates (sand) or cement cannot fill the gaps between coarse aggregates.
Mix design problems:
- Too little cement (lean mix below M20 grade)
- Excessive coarse aggregate proportion
- Poor gradation (all stones of similar size instead of varied sizes)
- Insufficient fine aggregate to fill voids
Standard residential mix: M20–M25 grade with proper cement:sand:aggregate ratio and water-cement ratio 0.45–0.50
5. Fast Pouring with High Free-Fall Height
Dropping concrete from heights above 1.5 meters causes segregation—the impact breaks apart the mix, separating heavy stones from cement paste.
What happens:
- Coarse aggregates bounce and collect at bottom
- Cement paste splashes to sides
- Result: Stone pockets with minimal bonding
Prevention: Use chute, tremie pipe, or elephant trunk to guide concrete directly into formwork with minimal drop.
6. Cold Joints / Delayed Concrete Placement
When there’s a long gap (over 30–45 minutes) between placing successive layers of concrete, the first layer begins to set. The new concrete doesn’t bond properly with the partially hardened layer below, creating a horizontal plane of weakness and potential honeycomb.
Common scenario: Waiting for next concrete mixer truck while previous batch hardens in formwork.
Prevention: Plan continuous concrete pour for each structural element; if delay is unavoidable, treat as construction joint with proper surface preparation.
7. Formwork Leakage / Poor Formwork Quality
Gaps in formwork joints, damaged plywood, or loose tie bolts allow cement paste (the liquid component) to leak out, leaving only stones behind.
Leakage points:
- Panel joints not sealed with foam tape or grease
- Worn plywood with holes
- Loose form tie bolts
- Bottom of column forms not sealed to floor
Result: Honeycomb appears exactly where leakage occurred, usually at formwork joints.
8. Poor Workmanship / Unskilled Labor
Many laborers on small construction sites lack proper training in concrete placement techniques.
Common mistakes:
- Throwing concrete from a distance instead of placing gently
- Not spreading concrete in uniform layers (dumping entire load in one spot)
- Over-vibrating (which also causes segregation)
- Walking on reinforcement, displacing bars
- Not coordinating pouring speed with vibration
9. Use of Low-Quality Materials
Substandard cement, contaminated aggregates (with clay, silt, organic matter), or improper storage damages concrete quality.
Quality issues:
- Cement exposed to moisture (partially hydrated before mixing)
- Aggregates with excessive dust/clay coating (prevents bonding)
- Dirty mixing water containing organic matter
- Old cement (beyond 3 months storage) with reduced strength
10. Hot Weather Concreting Without Precautions
In temperatures above 35–40°C (common in North India summers), concrete loses workability rapidly due to fast water evaporation. The mix becomes stiff before proper compaction, trapping air voids.
Hot weather problems:
- Rapid slump loss (concrete becomes unworkable within 20–30 minutes)
- Accelerated setting (less time for vibration)
- Plastic shrinkage cracks plus honeycomb
Prevention: Pour concrete in early morning or evening, use chilled water, cover freshly placed concrete with wet burlap immediately.
Serious Effects & Risks of Honeycomb Defects
Honeycomb isn’t just an aesthetic problem—it poses real structural, durability, and safety risks:
1. Reduced Concrete Strength
Voids mean less concrete volume carrying the load. A column with 10–15% honeycomb can lose 20–40% of its designed compressive strength. In severe cases, the structure cannot safely carry intended loads.
2. Water Seepage and Moisture Penetration
Honeycomb creates interconnected pathways for water to enter the concrete. This is especially dangerous in:
- Basement walls and retaining walls: Water leakage causes dampness, mold, and interior damage
- Terrace slabs: Leads to ceiling seepage and paint peeling
- Bathroom/kitchen areas: Chronic leakage problems
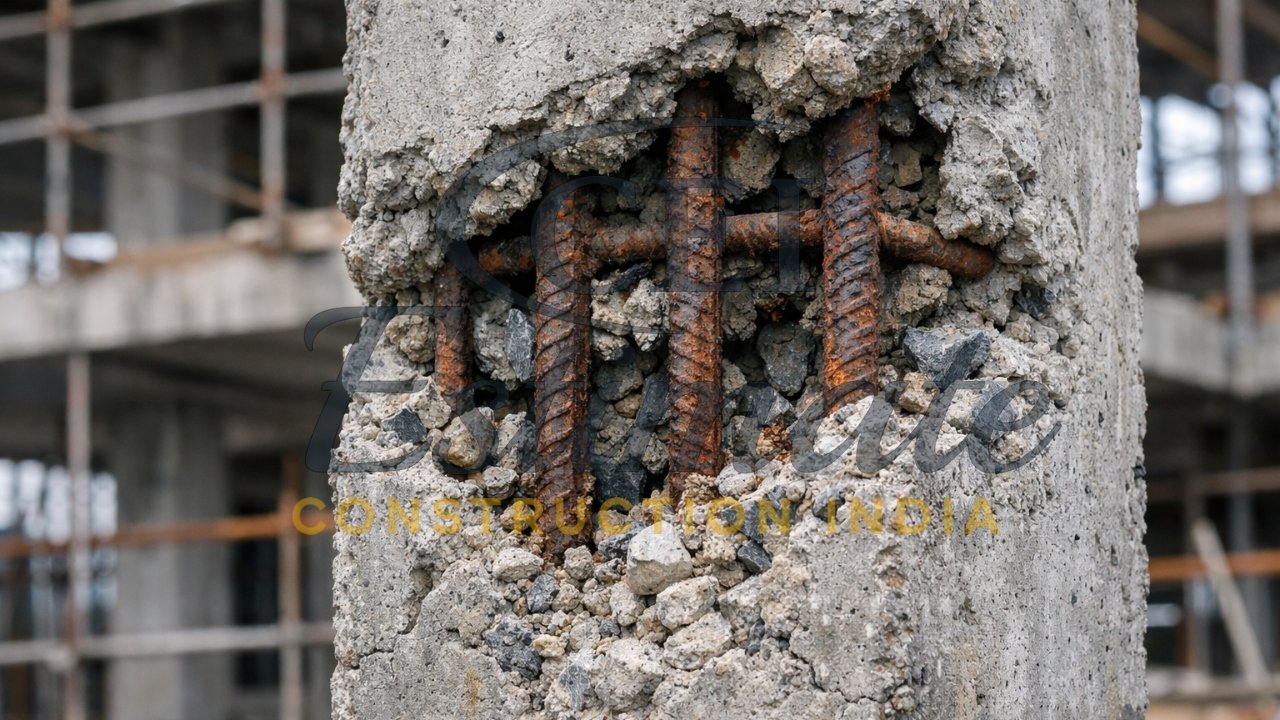
3. Corrosion of Reinforcement Steel
When water enters through honeycomb voids, it reaches the steel reinforcement bars. Water + oxygen causes rusting (corrosion), which:
- Expands the steel bar (rust occupies 2–3 times more volume than steel)
- Creates internal pressure, causing concrete to crack and spall
- Progressively reduces steel cross-section, weakening the structure
- Can eventually lead to structural failure if left unchecked for years
4. Aesthetic Damage and Reduced Property Value
Visible honeycomb on exposed columns, beams, or boundary walls looks unprofessional and substandard. For commercial buildings, showrooms, or homes you plan to sell/rent, honeycomb:
- Creates negative first impression
- Suggests poor construction quality
- Reduces property market value by 5–10%
- Makes plastering and finishing difficult (uneven surface)
5. Durability Loss and Shortened Lifespan
Concrete with honeycomb is porous and permeable. It allows:
- Aggressive chemicals (sulfates, chlorides) from soil or atmosphere to penetrate
- Freeze-thaw damage in cold climates (Uttarakhand, Himachal, Kashmir)
- Alkali-aggregate reaction acceleration
- Overall structure deterioration much faster than designed (30–40 year life reduced to 15–20 years)
6. Potential Structural Failure in Severe Cases
Extensive honeycomb in critical structural members (columns, beams, beam-column joints) can cause:
- Sudden load-bearing capacity reduction
- Progressive collapse risk during earthquakes (India is in seismic zones)
- Partial or complete structural failure requiring demolition and reconstruction
Real cost impact: A residential column with moderate honeycomb costs ₹8,000–₹20,000 to repair. A severely honeycombed column may require ₹50,000–₹2,00,000 in structural strengthening (jacketing, micropiling) or even demolition and reconstruction costing ₹5–10 lakh for a single column.
How to Prevent Honeycomb in Concrete – Best Practices 2026?
Prevention is 100 times easier and cheaper than repair. Follow these proven practices to eliminate honeycomb risk:
Mix Design and Materials
- Use correct concrete grade: Minimum M20 for residential RCC work (columns, beams, slabs); M25 or higher for heavy-load structures.
- Maintain proper water-cement ratio: Keep it between 0.45–0.50 (by weight). Never add extra water to make concrete “easier to work with”.
- Ensure good aggregate gradation: Mix should contain varied stone sizes (10 mm, 20 mm) and adequate fine aggregate (sand) to fill all voids.
- Use quality cement: Fresh, properly stored cement (PPC or OPC 43/53 from reputed brands). Avoid cement older than 3 months or exposed to moisture.
- Clean aggregates: Wash aggregates to remove clay, silt, and organic matter. Dusty stones don’t bond well with cement.
Concrete Placement Techniques
- Control pouring height: Never drop concrete from more than 1.5 meters free-fall. Use chute, tremie pipe, or canvas elephant trunk to guide concrete directly into forms.
- Pour in layers: For deep sections (columns, walls over 50 cm), place concrete in layers of 30–50 cm thickness. Vibrate each layer before adding the next.
- Pour continuously: Complete each structural element (column, beam, slab) in one continuous operation. Avoid breaks longer than 30 minutes.
- Proper slump: Target 75–100 mm slump for normal RCC work. Test with slump cone before pouring. If concrete is too stiff, adjust mix design for next batch—don’t add water on site.
Vibration and Compaction
- Use mechanical vibrator: Needle/immersion vibrator is mandatory for all RCC work. Hand tamping alone cannot eliminate honeycomb risk.
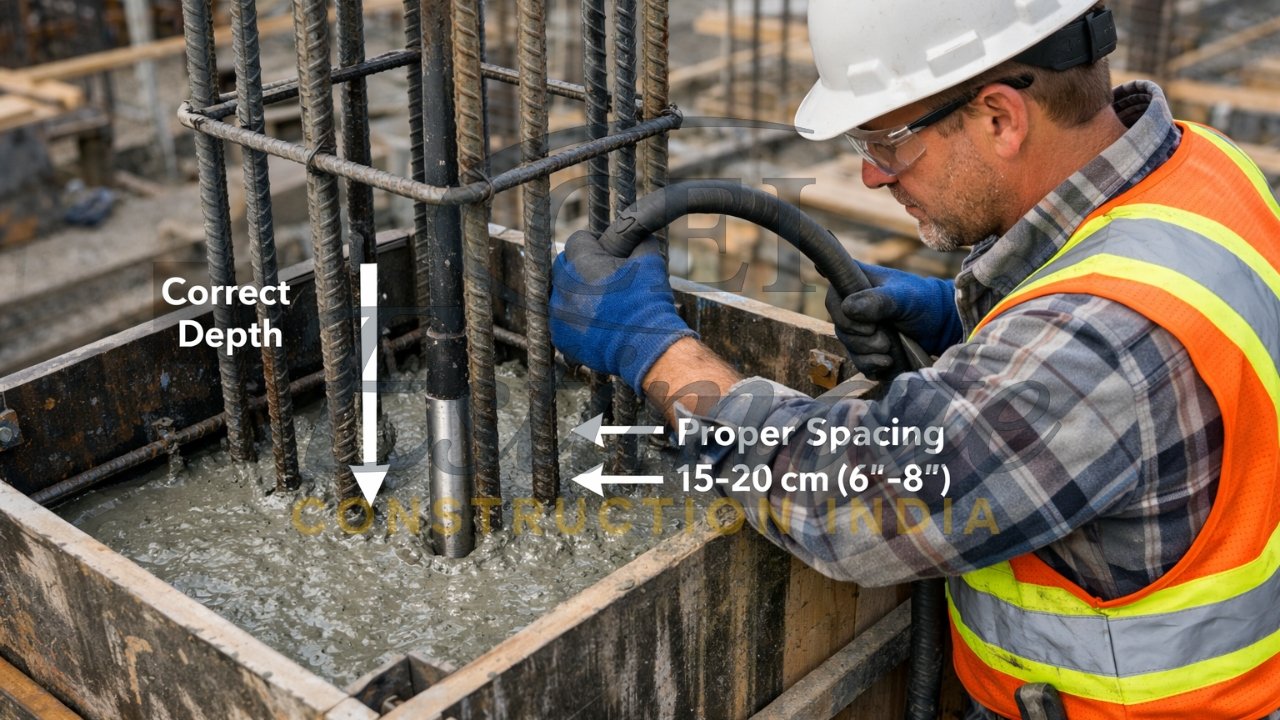
- Follow vibration protocol:
- Insert vibrator vertically into concrete
- Space insertion points 30–45 cm apart (roughly 1.5 times vibrator head diameter)
- Hold for 5–15 seconds until surface glistens and air bubbles stop rising
- Withdraw slowly (6–10 cm per second)
- Avoid touching reinforcement or formwork with vibrator (causes localized segregation)
- Vibrate at every layer: For deep pours, insert vibrator 10–15 cm into previous layer to ensure bond.
- Don’t over-vibrate: Excessive vibration (over 30 seconds in one spot) causes segregation—cement paste rises, stones sink.
Reinforcement and Formwork
- Maintain proper rebar spacing: Minimum 75 mm clear gap between parallel bars. For congested areas, reduce bar diameter or use higher grade steel (Fe 500D instead of Fe 415) to reduce number of bars.
- Adequate concrete cover: 25–40 mm cover (as per IS 456) ensures concrete can flow around rebars without blockage.
- Use self-compacting concrete (SCC) for congested areas: SCC flows into tight spaces without vibration, eliminating honeycomb risk in densely reinforced beam-column joints. Cost is 15–20% higher but worth it for critical areas.
- Quality formwork: Use rigid, well-maintained plywood or steel forms. Seal all joints with foam tape. Apply mold-release oil to prevent concrete from sticking and leaking.
- Check formwork before pouring: Inspect for gaps, loose bolts, alignment. Fix any issues before concrete arrives.
Labor and Supervision
- Hire skilled workers: Invest in trained masons and concrete laborers who understand proper placement techniques.
- Provide on-site supervision: Site engineer or experienced supervisor must monitor every concrete pour, checking vibration, placement, and curing.
- Train your team: Conduct brief training session before major pours (columns, slab) explaining correct techniques.
Weather and Timing
- Avoid extreme weather: Don’t pour in heavy rain (dilutes concrete), extreme heat (above 40°C), or freezing conditions (below 5°C).
- Hot weather precautions: Use chilled water, pour in morning/evening, cover immediately with wet burlap.
Curing
- Start curing within 24 hours: Once concrete has initial set, begin water curing.
- Cure for minimum 7 days (14 days is better): Keep concrete continuously moist. Proper curing develops full strength and reduces shrinkage cracks, which can worsen honeycomb damage.
🔧 Planning a concrete pour? Get mix design check + concrete quantity estimate + quality control checklist →
WhatsApp: +91 8630676890
(Share: Structure type + dimensions for accurate concrete BOQ)
Step-by-Step Repair Methods for Honeycomb (Minor to Severe)
If honeycomb has already appeared, act quickly—delaying repair worsens the damage. Repair method depends on severity:
Minor Honeycomb (Surface Voids < 10 mm Deep, < 10% Area)
Characteristics: Shallow cavities, cosmetic issue, no exposed reinforcement.
Repair Method: Dry Pack / Mortar Patching
- Surface preparation: Remove all loose concrete using wire brush or light chipping hammer. Don’t damage sound concrete.
- Clean thoroughly: Wash with water jet to remove dust and debris. Let surface drain but remain damp (saturated surface dry condition).
- Prepare repair mortar: Mix 1:3 cement:fine sand ratio with polymer modifier (SBR latex or acrylic bonding agent) for improved adhesion. Mix to stiff plasticity (low slump, not flowing).
- Apply bonding coat: Brush a thin slurry of cement + water (1:1 ratio) onto dampened surface 10 minutes before patching.
- Pack mortar: Apply mortar in layers with solid pressure (trowel + tamping) to eliminate air voids. Build up to match surrounding concrete level.
- Finish: Smooth surface with trowel to blend with existing concrete texture.
- Cure: Keep damp (wet burlap or periodic spraying) for 7 days minimum.
Cost: ₹80–₹150 per sq ft (material + labor)
Moderate Honeycomb (Voids 10–30 mm Deep, 10–30% Area, Some Exposed Rebar)
Characteristics: Deeper cavities, possible corrosion on steel, structural concern in localized area.
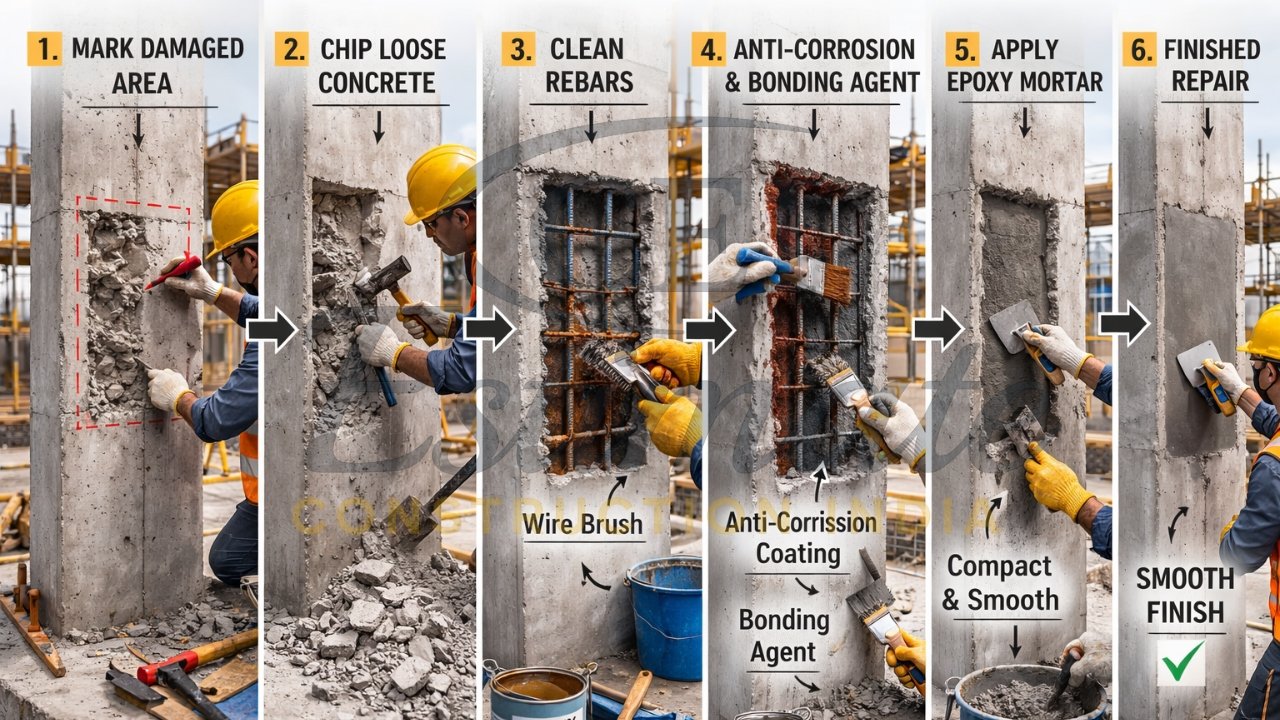
Repair Method: Chipping + Epoxy Mortar or Polymer-Modified Grout
- Mark repair area: Outline honeycomb zone plus 50 mm margin around it.
- Chip to sound concrete: Use light hammer and chisel to remove all honeycombed concrete to depth where sound, dense concrete appears (usually 30–50 mm). Create square or rectangular repair patch with edges perpendicular to surface (not tapered).
- Clean exposed reinforcement: If rebar is exposed, remove all rust using wire brush or angle grinder. If corrosion is severe (metal loss > 10%), consult structural engineer—rebar may need replacement.
- Apply anti-corrosion coating: Paint exposed rebar with zinc-rich primer or epoxy-based anti-corrosion coating.
- Dampen surface: Soak repair cavity with water for 2–3 hours before filling. Remove standing water but keep surface saturated.
- Apply bonding agent: Brush SBR latex or epoxy bonding agent on all surfaces of cavity.
- Fill with repair material:
- Option A (Polymer-modified mortar): Mix shrinkage-compensated, high-strength grout (e.g., Sika Grout, Fosroc Renderoc) with 6–10 mm aggregate (1:1 ratio by weight). Pour or pack firmly into cavity in layers up to 50 mm thick.
- Option B (Epoxy mortar): For critical areas, use epoxy resin + hardener + fine aggregate mix. Expensive but provides superior strength and bonding.
- Compact thoroughly: Use rod or small vibrator to eliminate air pockets in repair material.
- Finish and cure: Smooth surface to match surrounding concrete. Cover with wet burlap and cure for 7–10 days. For epoxy repairs, curing is not needed but protect from direct sun.
- Inspect: After 7 days, tap repair area with hammer—should sound solid, not hollow.
Cost: ₹150–₹250 per sq ft (material + labor)
Severe Honeycomb (Voids > 30 mm Deep, > 30% Area, Exposed Rebar, Structural Concern)
Characteristics: Extensive damage, possibly through-section voids, significant steel corrosion, load-bearing capacity questionable.
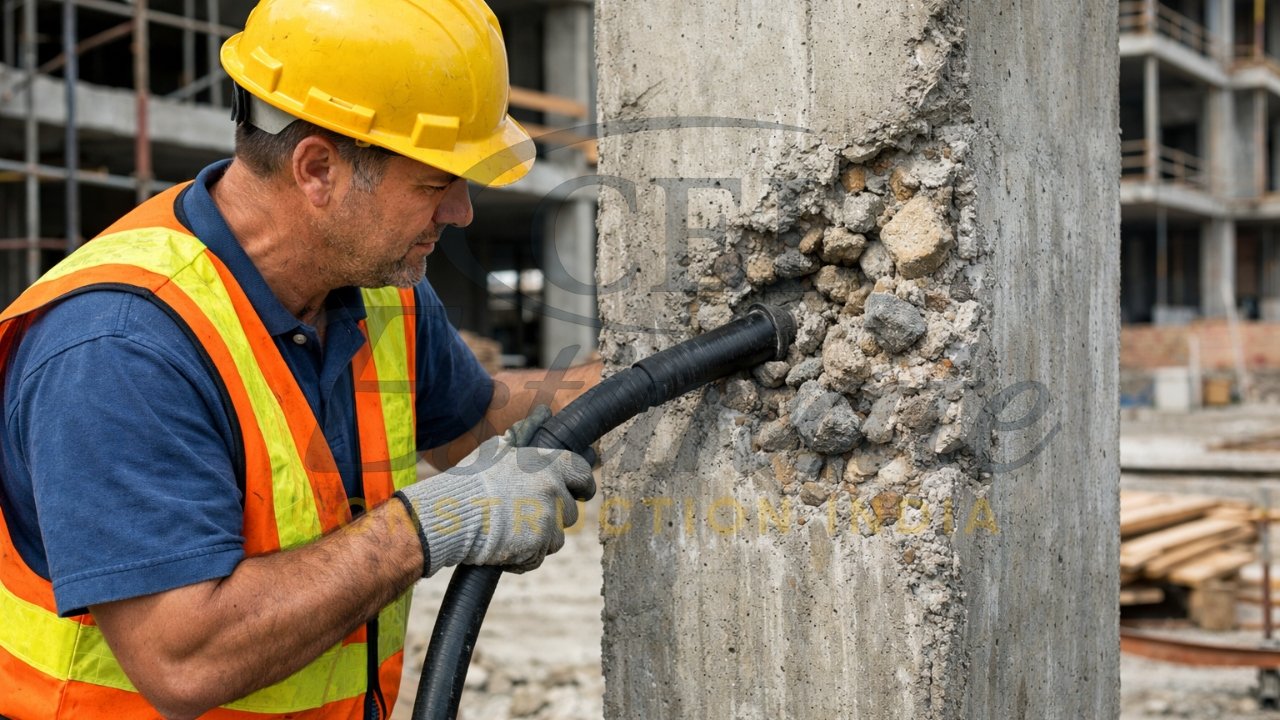
Repair Method: Structural Repair with Micro-Concrete / Guniting / Epoxy Injection
⚠️ Important: Consult a qualified structural engineer before attempting severe honeycomb repair. You may need load testing, structural assessment, and engineered repair design.
Typical Repair Procedure:
- Structural assessment: Engineer evaluates remaining concrete strength, rebar condition, and load-bearing capacity. May require non-destructive testing (rebound hammer, ultrasonic pulse velocity test).
- Temporary shoring (if needed): If column or beam strength is compromised, install temporary supports to carry load during repair.
- Remove all defective concrete: Chip away ALL honeycombed material until only sound, dense concrete remains. This may mean removing 50–100 mm depth or more.
- Expose and clean rebar: Remove rust with angle grinder + wire brush. If corrosion has reduced bar diameter by > 10%, engineer may specify additional reinforcement (new bars welded or epoxy-bonded to existing steel).
- Apply rebar protection: Coat all exposed steel with zinc-rich epoxy anti-corrosion coating (two coats).
- Install formwork: Build tight formwork around repair area, leaving inlet/outlet holes for grouting.
- Pressure grouting:
- Mix non-shrink, high-strength micro-concrete or cementitious grout (e.g., Sika Grout, BASF MasterFlow, Fosroc Conbextra).
- Add 6–10 mm aggregate (1:1 ratio) to minimize heat generation.
- Pump grout into cavity through inlet holes at bottom using grout pump under pressure (1–3 bar).
- Continue until grout flows out of top outlet holes (confirms complete filling).
- Close outlets and maintain pressure for 10–15 minutes.
- Alternative: Guniting (Shotcrete): For large areas, spray apply high-strength concrete mix using gunite machine. This builds up thickness in layers, allowing overhead and vertical application.
- Alternative: Epoxy injection: For fine cracks and small deep voids (especially in structural members where access is limited), inject low-viscosity epoxy resin under pressure through drilled injection ports.
- Remove formwork after 7 days: Inspect surface—should be solid with no voids.
- Cure for 14 days: Critical for strength development.
- Load testing (if specified): Engineer may require proof load test before returning structure to full service.
Cost: ₹250–₹500 per sq ft (material + specialized labor + equipment)
Full column repair (severe honeycomb): ₹15,000–₹50,000 depending on size and method.
When to Consult Structural Engineer
Always get professional evaluation if:
- Honeycomb covers > 20% of column/beam cross-section
- Visible through-section voids (you can see through the member)
- Reinforcement bars heavily corroded (rust flaking off, visible diameter reduction)
- Honeycomb in critical structural elements (main columns, beams carrying heavy loads, beam-column joints)
- Building shows signs of distress (cracks in walls/slabs, deflection)
- Structure is in seismic zone and honeycomb affects earthquake-resisting elements
Cost of structural assessment: ₹5,000–₹25,000 (site visit + testing + repair design + certification).
Cost of ignoring severe honeycomb: Potential structural failure = ₹5 lakh to ₹50 lakh in demolition, reconstruction, legal liability, and injury risk.
How Much Does Honeycomb Repair Cost in India?
Repair costs vary by severity, accessibility, and location (metro cities 20–30% costlier than Tier-2/3 towns). Here’s a realistic 2026 cost breakdown:
| Severity Level | Characteristics | Repair Method | Cost per Sq Ft | Typical Column Repair Cost |
| Minor | Surface voids < 10 mm, < 10% area | Dry pack mortar patching | ₹80–₹150 | ₹2,000–₹5,000 |
| Moderate | Voids 10–30 mm, 10–30% area, some exposed rebar | Polymer-modified grout or epoxy mortar | ₹150–₹250 | ₹8,000–₹20,000 |
| Severe | Voids > 30 mm, > 30% area, structural concern | Micro-concrete pressure grouting, guniting, or epoxy injection | ₹250–₹500 | ₹15,000–₹50,000 |
| Critical | Extensive damage, load-bearing risk | Structural jacketing, demolition + reconstruction | ₹500–₹1,500+ | ₹50,000–₹3,00,000 |
Additional costs:
- Structural engineer assessment: ₹5,000–₹25,000
- Non-destructive testing (rebound hammer, UPV): ₹3,000–₹10,000
- Scaffolding/access equipment: ₹5,000–₹15,000 for multi-story
- Project delay: 7–30 days (indirect cost in holding charges, labor idle time)
Hidden cost of poor quality: If honeycomb goes unrepaired:
- Water seepage repair every 2–3 years: ₹20,000–₹50,000
- Accelerated structure deterioration: Reduces building life by 10–15 years
- Property value loss: 5–10% market value reduction
- Risk of catastrophic failure: Priceless (life and property)
Prevention is the smart investment: Spending ₹10,000–₹20,000 on quality concrete work (proper mix, skilled labor, vibrator rental, supervision) prevents ₹50,000–₹2,00,000 in repair costs later.
💰 Need accurate honeycomb repair cost estimate for your project? Get FREE assessment + repair method recommendation →
WhatsApp: +91 8630676890
(Send photos of honeycomb damage + structure details)
How We Help You Avoid Honeycomb & Build Stronger Structures?
Preventing honeycomb starts at the planning stage—before the first bag of cement is purchased. Poor material estimation leads to wrong concrete grade, insufficient cement quantity, and on-site compromises that cause defects. Here’s how our service protects your construction quality:
Step 1: Share Your Project Details
WhatsApp us at +91 8630676890 with:
- House/building plan or sketches (if available)
- Structure type: RCC framed, load-bearing, or both
- Foundation, column, beam, slab dimensions
- Your location (city/district)
- Any specific concerns (congested reinforcement areas, deep beams, exposed structures)
Step 2: Accurate Concrete Mix Design Check
We review your requirements and recommend:
- Correct concrete grade for each structural element (M20, M25, M30)
- Proper mix proportions (cement:sand:aggregate:water ratios)
- Cement quantity per cubic meter to avoid under-strength lean mixes
- Slump specification for your structure type
- Special requirements (SCC for congested areas, waterproof concrete for basements, fiber-reinforced for slabs)
Step 3: Complete BOQ & Material Estimation
You receive detailed Bill of Quantities with:
✅ Exact concrete volume (cubic meters) for each structural element
✅ Cement bags required (50 kg bags) with 2–3% wastage factor
✅ Aggregate quantities (coarse + fine) in brass/cubic feet
✅ Reinforcement steel (TMT bars in kg, grade specification)
✅ Admixture requirements (if needed for SCC or waterproofing)
✅ Labor estimation (man-days for concreting, vibration, curing)
✅ Equipment rental (concrete mixer, vibrator, scaffolding)
✅ Total material cost at current market rates in your location
Step 4: Quality Control Guidance
Along with BOQ, we provide:
📋 Pre-pour checklist: Formwork inspection, rebar placement verification, vibrator functionality test
📋 Concrete placement protocol: Pouring sequence, vibration spacing, layer thickness
📋 Common mistake alerts: Specific risks for your structure type
📋 Curing schedule: 7–14 day water curing plan
📋 Acceptance criteria: How to identify good vs. defective concrete after formwork removal
Step 5: Full House Construction Budget (Optional)
If you’re building a new house, we prepare complete cost estimation covering:
- Foundation (excavation, PCC, RCC footing, plinth)
- RCC structural frame (columns, beams, slabs—honeycomb prevention focus)
- Brickwork / blockwork
- Plaster (internal + external)
- Flooring, doors, windows
- Electrical, plumbing, sanitary
- Finishing (paint, tiles, fixtures)
- Labor breakdown by trade
- Timeline estimate (months)
Total cost projection accuracy: 90–95% based on current material rates and your location.
Why This Prevents Honeycomb?
- Right material quantities from day one: No cutting corners or using wrong grade cement to “save money”
- Proper mix design: Ensures adequate fine aggregate and cement content for void-free concrete
- Quality control awareness: You and your contractor know exactly what to check
- Budget confidence: No mid-project fund shortage forcing compromises on vibration, skilled labor, or curing
🏗️ Start your project right—prevent honeycomb before it happens:
WhatsApp: +91 8630676890
Get:
✅ Concrete mix design check
✅ Accurate cement & aggregate quantity estimate
✅ Complete construction BOQ
✅ Quality control checklist
✅ Full house budget (if building new)
Delivery time: 10–30 minutes for basic estimate; 2–4 hours for complete house BOQ
Frequently Asked Questions (FAQ)
1. What is the main cause of honeycomb in concrete?
The #1 cause is improper vibration or under-vibration of fresh concrete. When concrete isn’t mechanically compacted using a needle vibrator, trapped air remains in the mix, creating voids between aggregates. Other major causes include excessive water (high slump), congested reinforcement preventing concrete flow, and poor mix design with insufficient fine aggregate.
2. How can I identify honeycomb before removing formwork?
Unfortunately, you cannot reliably detect honeycomb before formwork removal. Some warning signs during pouring include: concrete not flowing into tight spaces despite vibration, visible segregation (stones separating from cement paste), and formwork leaking cement slurry. The only prevention is following proper concrete placement technique and using transparent inspection windows in critical formwork sections (not common in India).
3. Is honeycomb a structural defect or just cosmetic?
It depends on severity. Minor surface honeycomb (< 5% area, < 10 mm deep) is mostly cosmetic but still requires repair to prevent water entry and corrosion. Moderate honeycomb (10–30% area) is a structural concern—it reduces load-bearing capacity and must be properly repaired. Severe honeycomb (> 30% area, through-section voids) is a serious structural defect requiring immediate engineering assessment and may need demolition and reconstruction.
4. Can I prevent honeycomb by just adding more water to make concrete flow easily?
No—this is one of the worst mistakes! Adding excess water causes segregation (separation of aggregates from cement), actually increasing honeycomb risk. It also drastically reduces concrete strength (10% extra water = 20–30% strength loss). The correct approach is: use proper mix design with adequate fine aggregate and plasticizer admixture for workability, then vibrate mechanically.
5. What is self-compacting concrete (SCC) and should I use it?
Self-Compacting Concrete (SCC) is a special high-fluidity concrete that flows into tight spaces and compacts under its own weight without vibration. It’s ideal for:
- Densely reinforced beam-column junctions
- Thin walls with congested rebar
- Complex architectural shapes
- Areas where vibrator cannot reach
Pros: Eliminates honeycomb risk in congested areas; faster placement; better finish quality.
Cons: 15–20% more expensive than normal concrete; requires precise batching; not needed for simple structures with normal reinforcement spacing.
When to use: For critical congested areas in important projects. For typical residential construction with normal rebar spacing, standard concrete with proper vibration is sufficient and more economical.
6. How much strength does concrete lose due to honeycomb?
Strength loss depends on honeycomb extent:
- Minor honeycomb (< 5% volume): 5–10% strength reduction
- Moderate honeycomb (5–15% volume): 15–30% strength reduction
- Severe honeycomb (> 15% volume): 30–50%+ strength reduction, possible structural failure
Additionally, honeycomb creates stress concentration points, making concrete more vulnerable to cracking under load and reducing ductility (ability to deform without sudden failure)—critical for earthquake resistance.
7. Can honeycomb be completely fixed, or will it always be a weak point?
Properly repaired honeycomb can restore 85–95% of original strength, but it will never be exactly as good as defect-free concrete cast correctly the first time. Key factors for successful repair:
- Complete removal of all defective concrete (no half measures)
- Proper surface preparation and bonding agent
- Quality repair material (polymer-modified grout or epoxy mortar, not plain cement mortar)
- Thorough curing
Even after good repair, the interface between old and new concrete remains a potential weak point. This is why prevention is always superior to repair.
8. What is the minimum vibration time for concrete?
For normal RCC work using 40–50 mm diameter needle vibrator, minimum vibration protocol is:
- Insertion spacing: 30–45 cm apart (roughly 1.5 times vibrator head diameter)
- Duration per spot: 5–15 seconds (until air bubbles stop rising and surface glistens)
- Insertion depth: Vibrator should penetrate 10–15 cm into previous layer
- Withdrawal speed: 6–10 cm per second (slow withdrawal prevents void formation)
Over-vibration caution: Holding vibrator in one spot for > 30 seconds causes segregation. Move systematically through entire pour area rather than over-working one spot.
9. How do I calculate concrete quantity to avoid ordering wrong grade or volume?
Basic formula:
Concrete volume (m³) = Length (m) × Width (m) × Height (m)
For different elements:
- Slab: Area (m²) × Thickness (m)
- Column: Cross-section area (m²) × Height (m)
- Beam: (Length × Depth × Width) in meters
Add 5–7% wastage factor for spillage, uneven ground, etc.
To get grade right: Residential RCC requires minimum M20 grade (20 MPa / 200 kg/cm² compressive strength). Use M25 for heavy-load structures or ground floor columns in multi-story buildings.
Don’t guess: Small errors in volume estimation mean ordering wrong quantity, leading to cold joints (if too little) or wastage + wrong grade mix on-site adjustments (if estimating poorly).
Get professional BOQ to ensure correct volume, grade, and material quantities →
WhatsApp: +91 8630676890
10. Is it safe to live in a house with honeycomb in columns?
It depends on severity and location:
- Minor cosmetic honeycomb on non-structural elements (boundary wall, architectural feature): Safe, but repair to prevent water damage and corrosion
- Moderate honeycomb on main structural column/beam: Potentially unsafe—must be assessed by structural engineer and properly repaired before occupancy
- Severe honeycomb on load-bearing column: Unsafe—do not occupy until structural engineer evaluates, designs repair/strengthening, and certifies the structure
Honeycomb in columns is more serious than in slabs or beams because columns carry the entire building load. Even if a honeycombed column hasn’t failed yet, it has reduced safety margin—danger increases during earthquakes, heavy rains (water weakens concrete further), or if you add extra load (additional floor, heavy water tanks).
When in doubt, get structural assessment: ₹5,000–₹15,000 spent on professional evaluation could save your family’s life and avoid lakhs in future reconstruction.
Conclusion: Honeycomb-Free Construction Starts with Smart Planning
Honeycomb in concrete is not an unavoidable bad luck—it’s a preventable defect caused by specific mistakes during mixing, placing, or curing. The three pillars of honeycomb prevention are:
- Proper mix design with adequate fine aggregate, correct water-cement ratio, and appropriate grade
- Mechanical vibration with trained workers using correct technique (spacing, duration, depth)
- Quality control through supervision, formwork inspection, and proper curing
When honeycomb does occur, repair it immediately—delays worsen the damage through water seepage and steel corrosion. Minor honeycomb costs ₹80–₹150/sq ft to fix; severe cases cost ₹250–₹500/sq ft plus structural engineering fees. In the worst cases, demolition and reconstruction cost ₹50,000–₹3,00,000 per column.
The smartest investment is prevention through accurate planning. When you start with the right concrete quantity, proper mix design, and quality control knowledge, you avoid honeycomb entirely—saving not just repair costs, but also project delays, structural risk, and the stress of dealing with defects.
🛡️ Build Strong, Build Right—Eliminate Honeycomb Risk from Day One
Get Your FREE Concrete Quality Package:
📲 WhatsApp: +91 8630676890
Share:
✔️ Your structure type (house, commercial building, warehouse, etc.)
✔️ Foundation, column, beam, slab dimensions (or full house plan if available)
✔️ Location (city/district)
✔️ Current project stage (planning, foundation ongoing, RCC work upcoming)
You’ll receive:
✅ Concrete mix design recommendation (M20/M25/M30 grade + proportions)
✅ Accurate concrete volume calculation (cubic meters for each element)
✅ Cement & aggregate quantity (bags + brass/cubic feet)
✅ Quality control checklist (pre-pour, during pour, post-pour inspections)
✅ Honeycomb prevention guide for your specific structure
✅ Complete construction BOQ & budget (if building new house/structure)
✅ Honeycomb repair cost estimate (if you have existing damage—send photos)
Delivery: 10 minutes for quick estimates; 2–4 hours for complete house BOQ
Don’t let poor concrete work compromise your building’s strength and your family’s safety.
Start with accurate estimation, end with a structure that lasts 50+ years.
WhatsApp NOW: +91 8630676890